ASP.NET MVC Practical Hands-On Lab Tutorial (Free from the Software University)
As part of the ASP.NET MVC Web Development course at the Software University I developed a practical MVC hand-on lab (tutorial) that gives rich experience in building data-driven Web applications with ASP.NET MVC, ASP.NET MVC 5, SQL Server, C#, Visual Studio, Entity Framework (code first), AJAX, jQuery, Bootstrap and other modern technologies and tools. In this lab you will create a web based event management sytem, from zero to fully working web application. Enjoy this free practical ASP.NET MVC tutorial for beginners. The source code is intentionally given as images to avoid copy-pasting.
ASP.NET MVC Lab (May 2015) – Web Based Events Management System
The goal of this lab is to learn how to develop ASP.NET MVC data-driven Web applications. You will create MVC application to list / create / edit / delete events. The recommended development IDE to use for this Lab is Visual Studio 2013 with the latest available updates + SQL Server 2012. Let’s start building the event management system in ASP.NET MVC step by step.
Project Assignment
Design and implement a Web based event management system.
· Events have title, start date and optionally start time. Events may have also (optionally) duration, description, location and author. Events can be public (visible by everyone) and private (visible to their owner author only). Events may have comments. Comments belong to certain event and have content (text), date and optional author (owner).
· Anonymous users (without login) can view all public events. The home page displays all public events, in two groups: upcoming and passed. Events are shown in short form (title, date, duration, author and location) and have a [View Details] button, which loads dynamically (by AJAX) their description, comments and [Edit] / [Delete] buttons.
· Anonymous users can register in the system and login / logout. Users should have mandatory email, password and full name. User’s email should be unique. User’s password should be non-empty but can be just one character.
· Logged-in users should be able to view their own events, to create new events, edit their own events and delete their own events. Deleting events requires a confirmation. Implement client-side and sever-sidevalidation data validation.
· A special user “[email protected]” should have the role “Administrator” and should have full permissions to edit / delete events and comments.
Step 1. Empty Visual Studio Solution
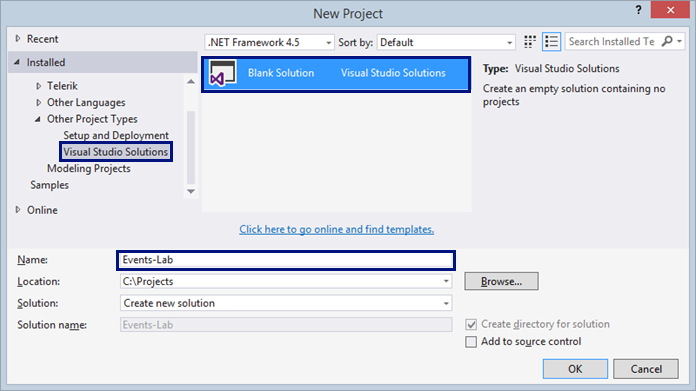
Create a new empty Visual Studio Solution named “Events-Lab“:
This VS solution will hold your projects: data layer project and ASP.NET Web application project.
Step 2. Empty MVC Project with User Accounts
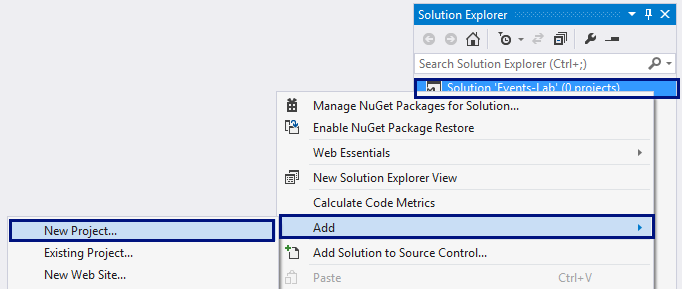
Create and empty ASP.NET MVC project by the default Visual Studio template with built-in user accounts and authentication. First, click on the solution, choose [Add] à [New Project…]:
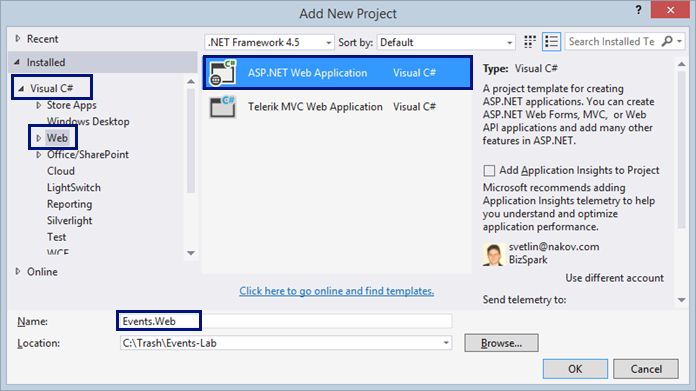
Choose [Visual C#] à [Web] à [ASP.NET Web Application]. Name the application “Events.Web“. It will hold your ASP.NET MVC Web application (controllers, views, view models, etc). The data access layer (entity classes + Entity Framework data context) will be separated in another application.
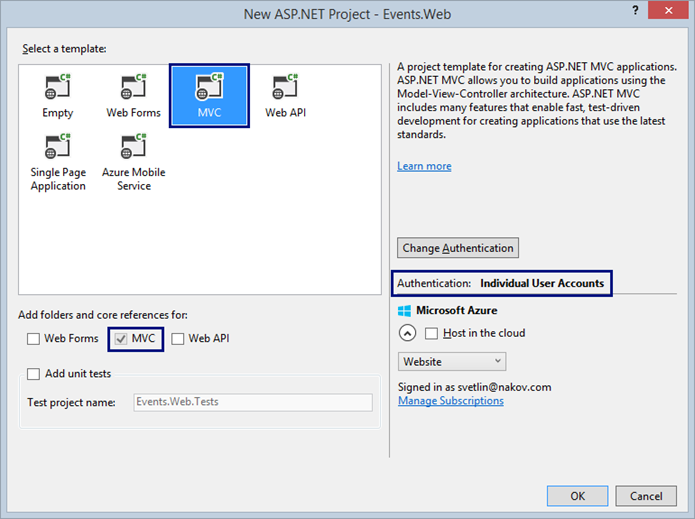
Next, choose the “MVC” project template + “Individual User Accounts” as authentication type.
Visual Studio will generate an ASP.NET MVC application by template, which will serve as start (skeleton) for your Events management system. The application uses a typical Web development stack for .NET developers:ASP.NET MVC 5 as core Web development framework, Bootstrap as front-end UI framework, Entity Framework as data layer framework, ASP.NET Identity system as user management framework, and SQL Server as database.
Step 3. Customize the MVC Application
The project generated by the Visual Studio template needs many adjustments. Let’s customize the generated code for your Events management system.
1. Edit the connection string in the Web.config file to match your database server settings. In our case, we will use a database “Events” in MS SQL Server 2014 Local DB: (LocalDb)\MSSQLLocalDB:
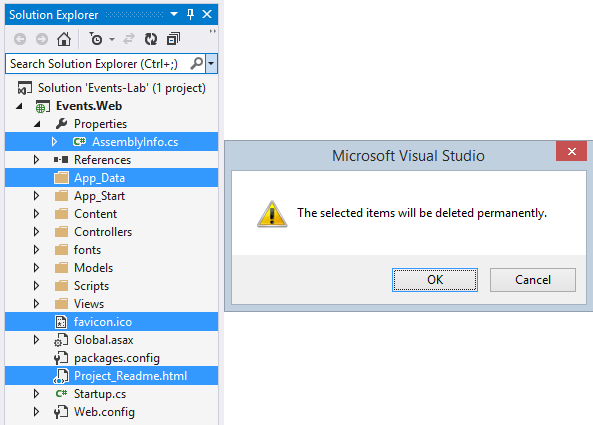
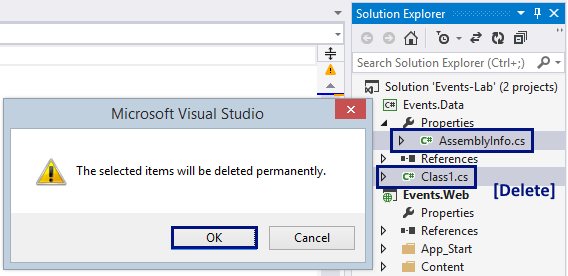
2. Delete some unneeded files:
o AssemblyInfo.cs – holds application metadata (not needed at this time)
o App_Data folder – holds the application database (not needed, we will use SQL Server Local DB)
o favico.ico – holds the Web application icon used in the browser location bar. We will not use it. We can add it later.
o Project_Readme.html – holds instructions how to start out MVC project
3. Build and run the application to check whether it works, e.g. by clicking [Ctrl + F5]:
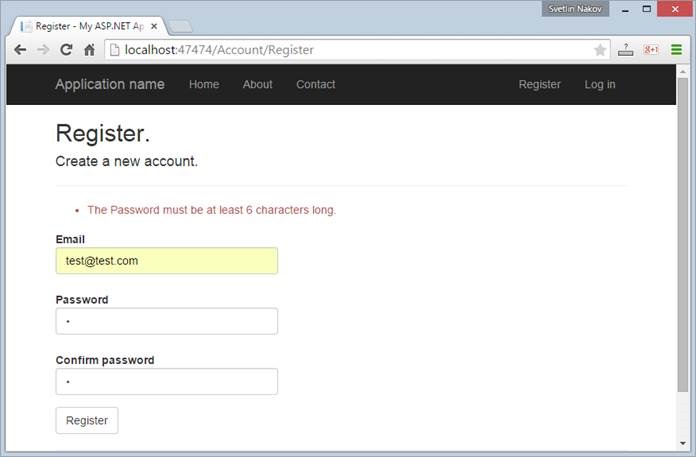
4. Test the user registration functionality. You should have out-of-the-box user registration, login and logout:
You have a problem. By default, the MVC application is configured to use too complex passwords. This will make hard the testing during the development.
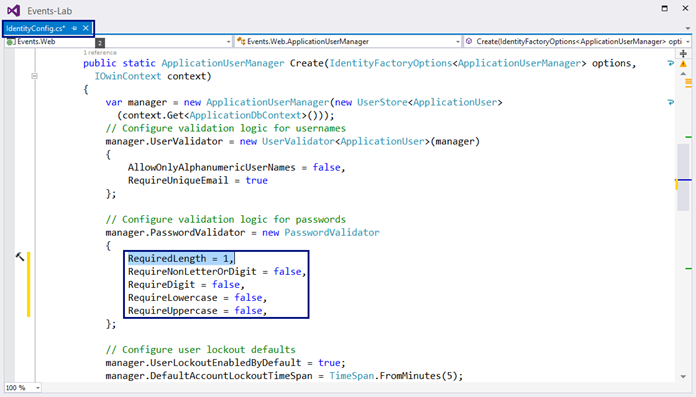
5. Let’s change the password validation policy:
· Modify the PasswordValidator in the file App_Start\IdentityConfig.cs:
· Modify the password minimum length in the class RegisterViewModel. It is located in the file Models\AccountViewModels.cs:
· Modify the password minimum length in the SetPasswordViewModel and ChangePasswordViewModel classes, located in the file Models\ManageViewModels.cs:
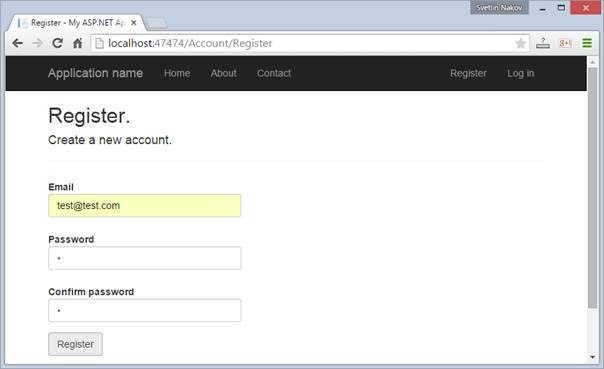
6. Recompile and run the application again. Test the user registration, login and logout again. E.g. try to register user “[email protected]” with password “1“:
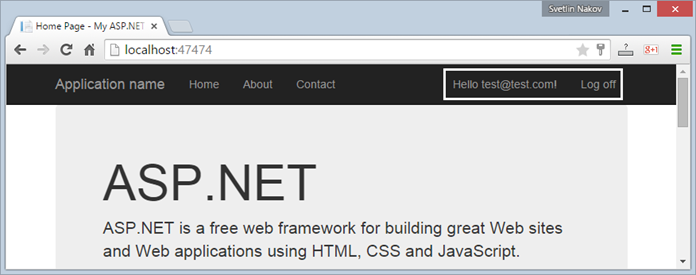
After a bit of waiting, Entity Framework will create the database schema in SQL Server and the MVC application will register the user in the database and will login as the new user:
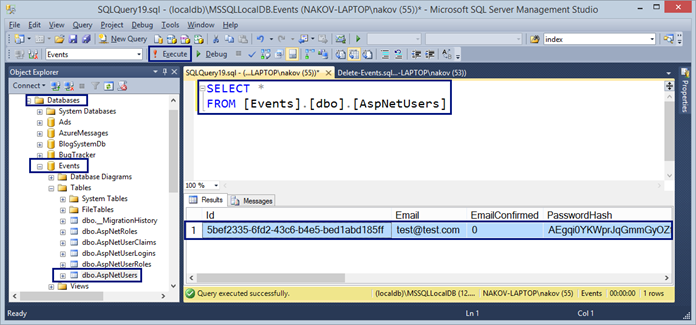
7. Open the database to ensure it works as expected. You should have a database “Events” in the MS SQL Server Local DB, holding the AspNetUsers table, which should hold your registered user account:
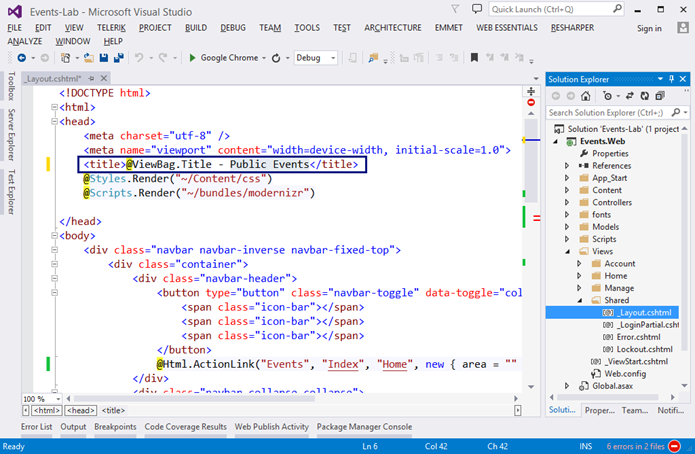
8. Now let’s edit the application layout view. Edit the file \Views\Shared\_Layout.cshtml.
· Change the application’s title:
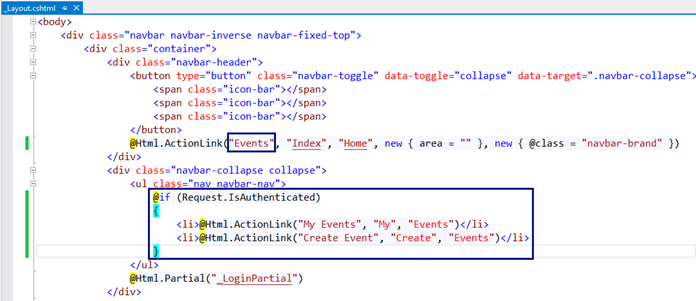
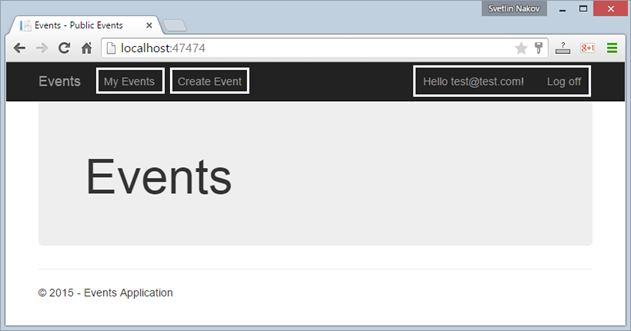
· Change the navigation menus. Change the home page link. Replace the “About” and “Contact” links with the code shown below. The goal is to put “My Events” and “Create Event” links for logged-in users only. Anonymous site visitors will have only “Events” link to the home page, while logged in users will be able to see their events and create new events:
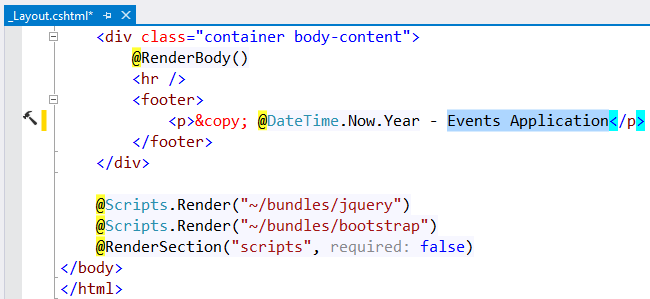
· Change the application footer text as well:
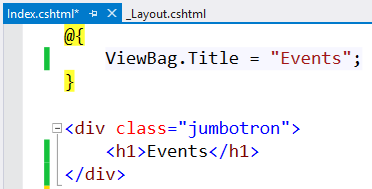
· Remove the junk code from the home controller’s default view \Views\Home\Index.cshtml:
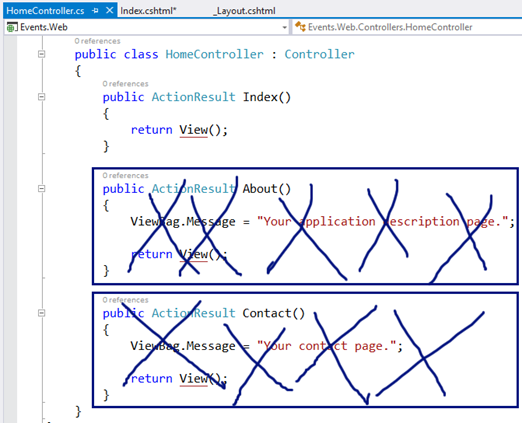
· Remove the unneeded HomeController‘s actions “About” and “Contacts“:
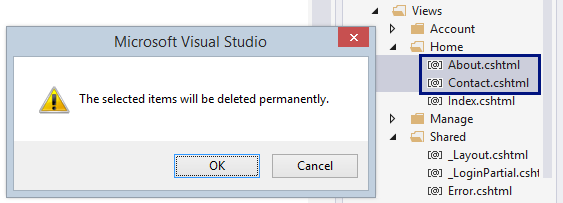
· Delete the unneeded Home controller’s views About.cshtml and Contact.cshtml:
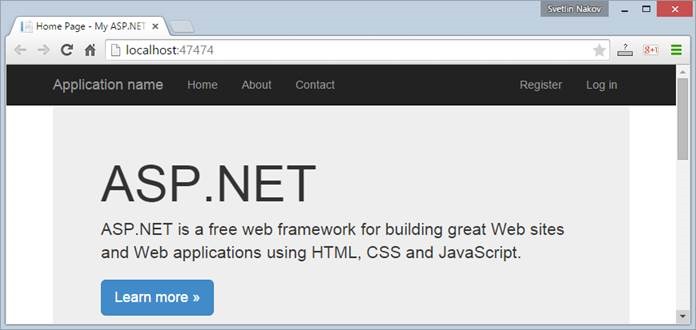
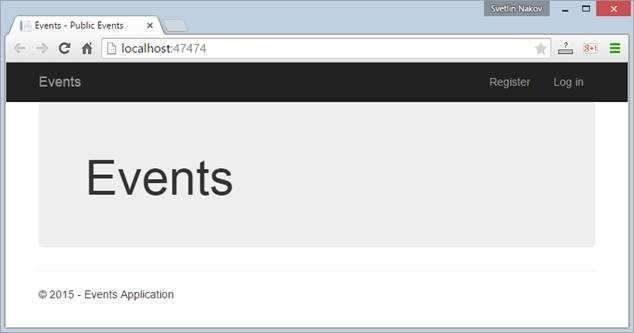
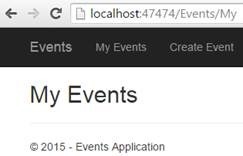
9. Now run the application to test it again. It should look like this for anonymous users:
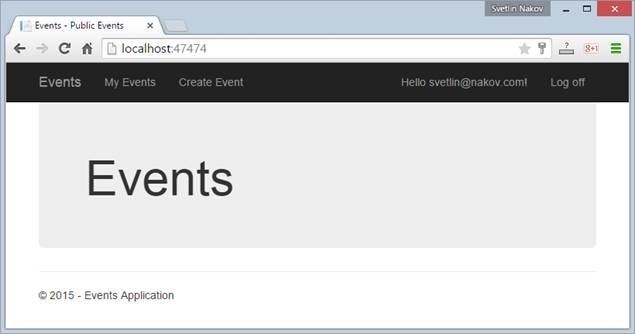
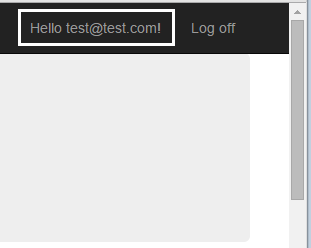
After login, the application should display the user’s navigation menus. It should look like this:
Now you are ready for the real development on the Events management system. Let’s go.
Step 4. Separate the EF Data Model from the MVC Application
The application structure is not very good. It mixes the entity data models with the Entity Framework data context and the MVC view models for the views and MVC input models for mapping the forms. Let’s restructure this.
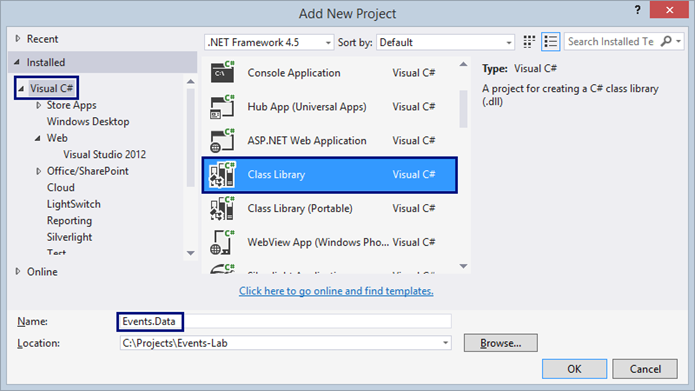
1. Create a new Class Library project “Events.Data” in your solution in Visual Studio:
2. Delete the unneeded files from the Events.Data project:
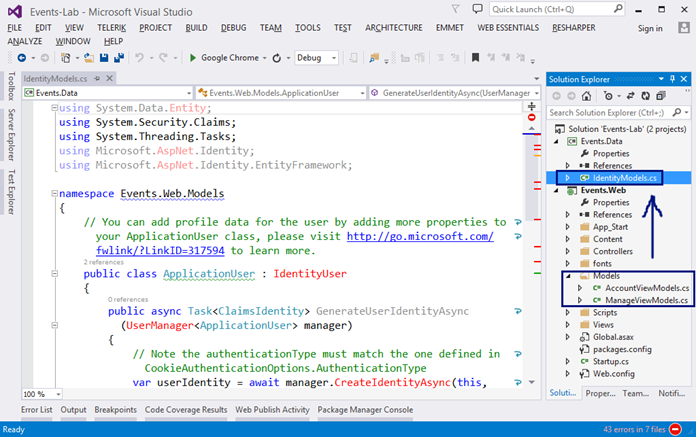
3. Move the file Events.Web\Models\IdentityModels.cs to the new project Events.Data. You can use [Edit] à [Cut] à [Paste].
4. Now the Visual Studio Solution will not compile. Many errors will be shown if we rebuild with [F6]:
We need to fix some issues: class names, file names, library references, project references, etc.
5. Extract the class ApplicationUser into a file named “ApplicationUser.cs“. Change its namespace to “Events.Data“. Your code should look like this:
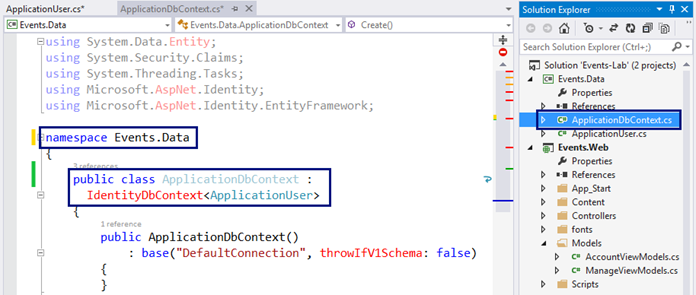
6. Rename the IdentityModel.cs file to ApplicationDbContext.cs. This file will hold your Entity Framework database context – the class ApplicationDbContext. Change its namespace to Events.Data. Your code should look like this:
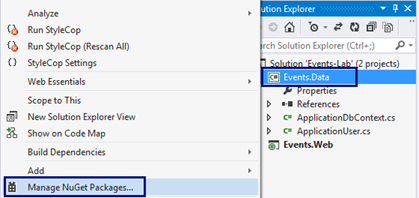
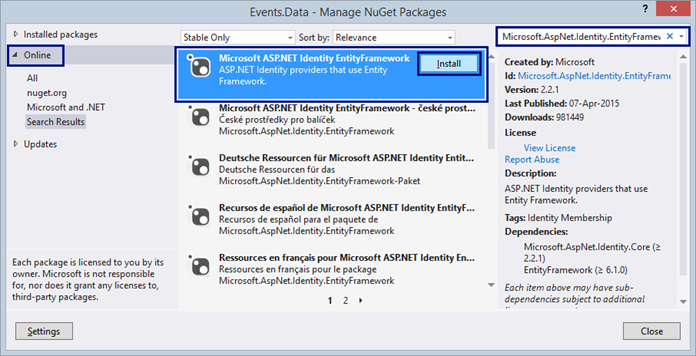
7. Your code will still not compile. Now you should add NuGet references to the missing libraries: Entity Framework, Microsoft.AspNet.Identity.Core and Microsoft.AspNet.Identity.EntityFramework:
It is enough to reference the package “Microsoft.AspNet.Identity.EntityFramework“. The others depend on it and will be installed by dependency.
8. Fix the missing “using …” in the code. The project Events.Data should compile without errors.
9. The project Events.Web will not compile due to missing classes: ApplicationUser and ApplicationDbContext. Let’s fix this.
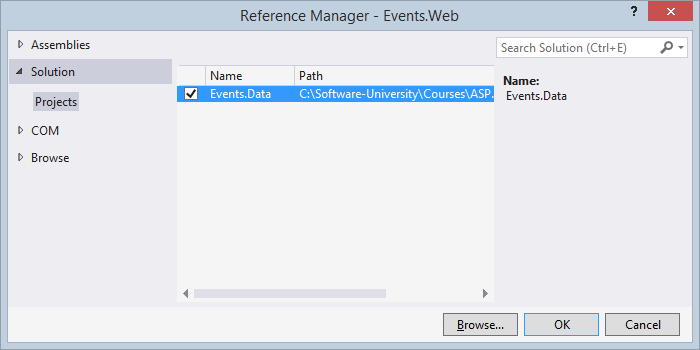
10. Add project reference from Events.Web project to Events.Data project:
11. Fix the missing “using Events.Data;” statements in the Events.Web project.
Now the project should compile correctly. If not, check your library and project references and “using” statements.
12. Test the MVC application. It should work correctly. Test the Home Page, Register, Login and Logout:
Step 5. Define the Data Model
Now you are ready to define the data model for the Events management system: entity classes + Entity Framework database context + data migration classes. Let’s define the entity classes:
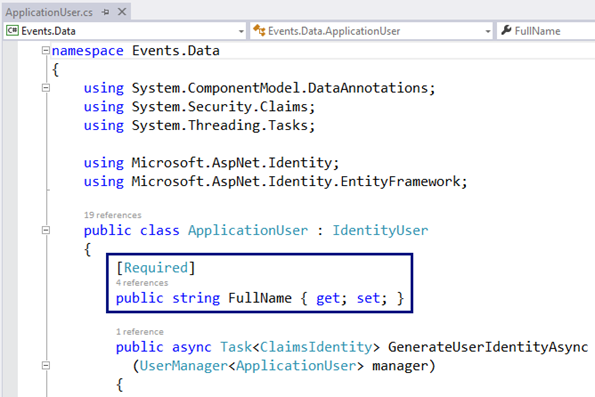
1. First, add a full name in the ApplicationUser class. It will hold the name of the event’s author:
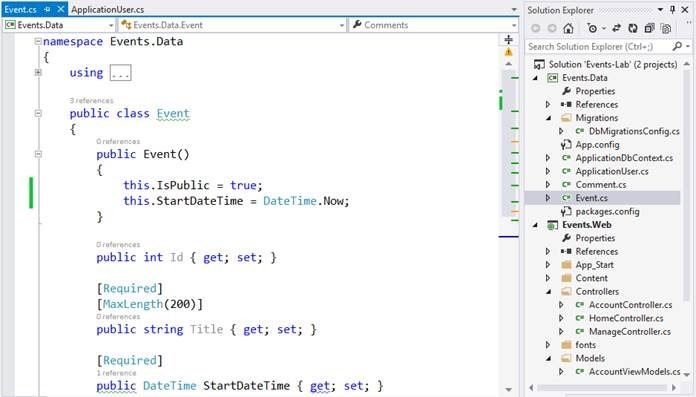
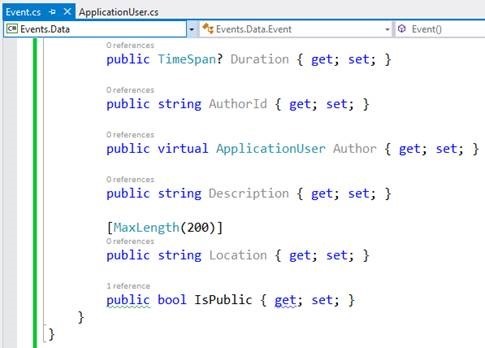
2. Next, create your Event class. It will hold the events and their properties:
Compile your code. It should compile without errors.
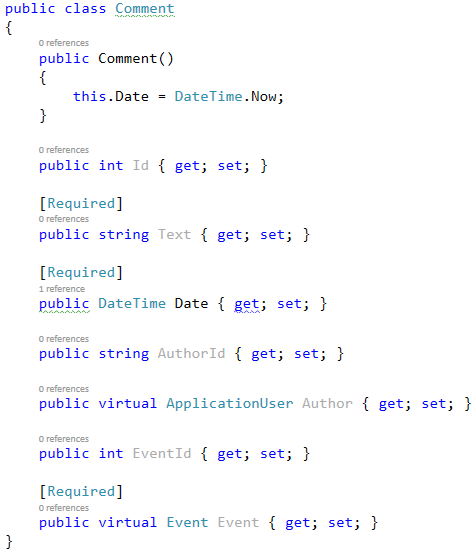
3. Create your Comment class. It will hold the comments for each event:
Compile your code. It should compile without errors.
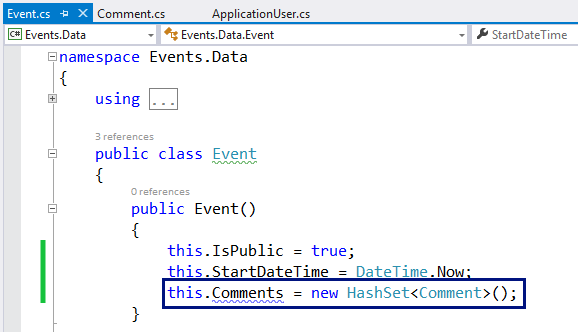
4. Add comments to the Event class:
Compile again your code. It should compile without errors.
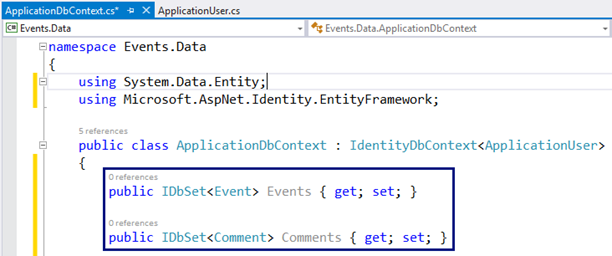
5. Modify the ApplicationDbContext class to include the events and comments as IDbSet<T>:
Compile again your code. It should compile without errors.
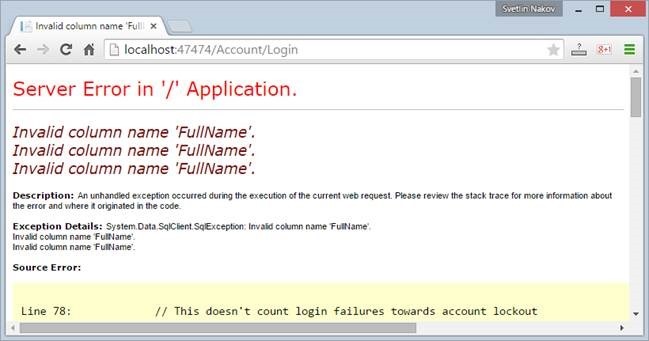
6. Run the MVC application. It will fail at the Login action. Think why!
You need a migration strategy for the database, right? How shall changes in the DB schema be handled?
Step 6. Configure Database Migrations
Now you will configure automatic migration strategy for the database to simplify changes in the database schema during the project development.
1. First, enable the database migrations from the Package Manager console for the Events.Data project:
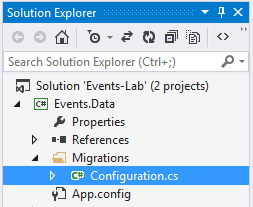
The command “Enable-Migrations” will generate a file Migrations\Configuration.cs in the Events.Data project:
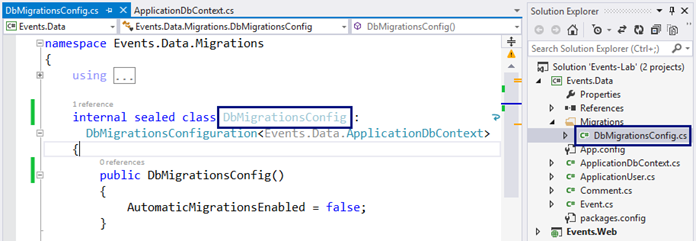
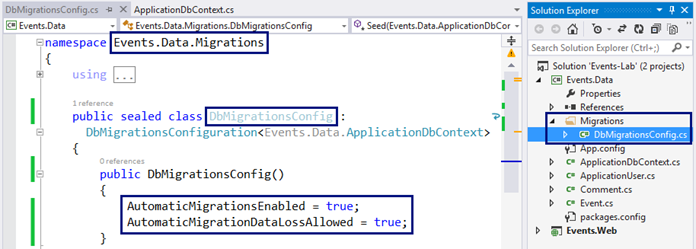
2. The generated DB migration class has non-informative name. It is a good practice to rename it: Configuration à DbMigrationsConfig. Rename the file that holds this class as well: Configuration.cs àDbMigrationsConfig.cs.
3. Edit the DB migration configuration: make the class public (it will be used by the MVC project); enable automatic migrations; enable data loss migrations:
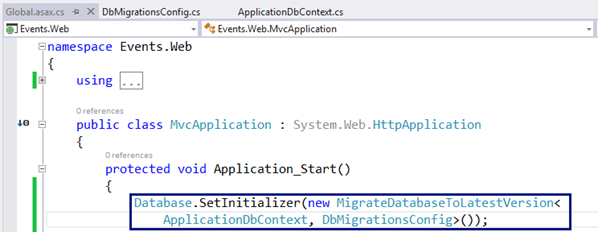
4. Set the database migration configuration in the database initializer in your Global.asax file in your MVC Web application:
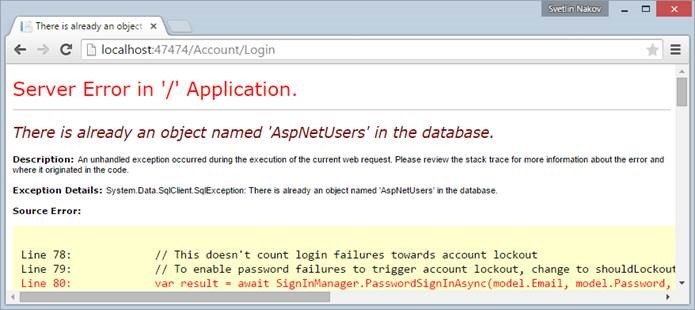
5. Now run the MVC application to test the new database migration strategy. Rebuild the application and run it. The application will fail!
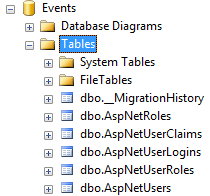
Seems like the database migration has not been executed, right? You could also check the database:
The new tables (Events and Comments) are missing.
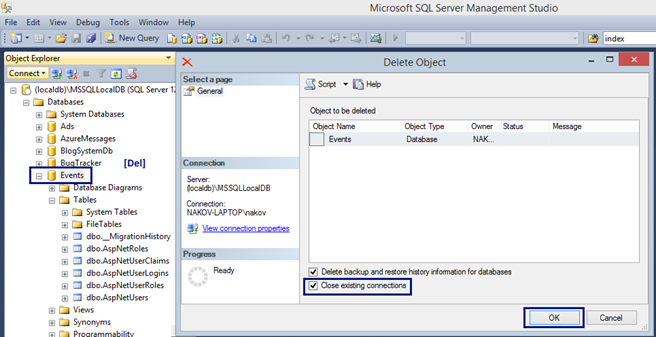
6. Let’s fix this problem. The easiest way is just to drop the database:
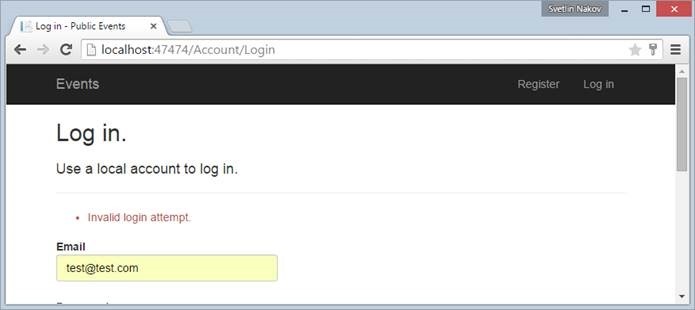
7. Let’s run the MVC Web application again and try to login. It will say “Invalid login“:
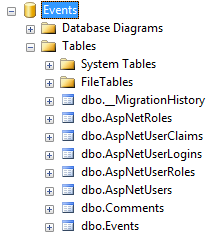
This is quite normal: we dropped the entire database, right? Let’s see what the database holds now:
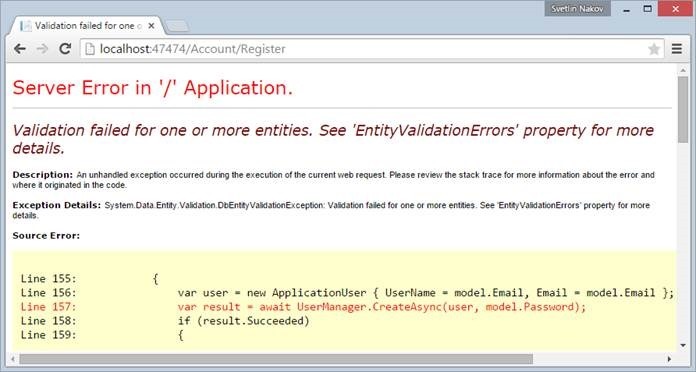
8. Let’s register a new account. The application will fail with “Entity Validation Errors“:
The problem comes from the field “FullName” in the ApplicationUser class. It is required but is left empty.
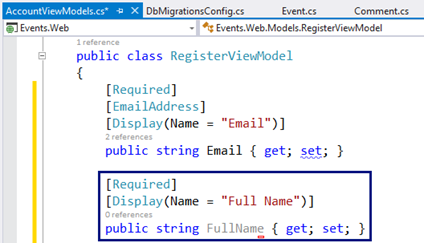
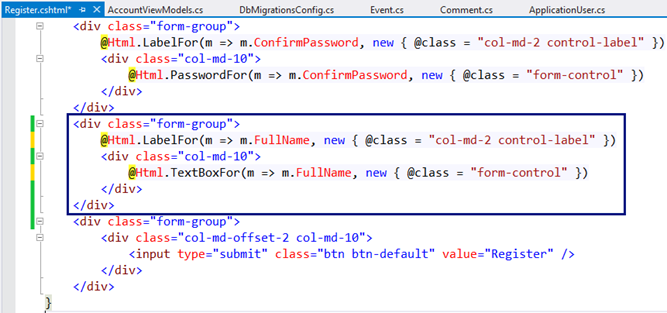
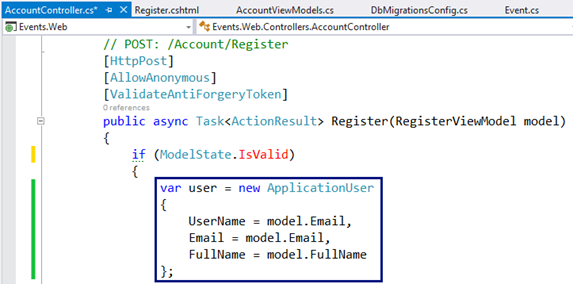
9. We need to change the RegisterViewModel, the Register.cshtml view and the Register action in the AccountController to add the FullName property:
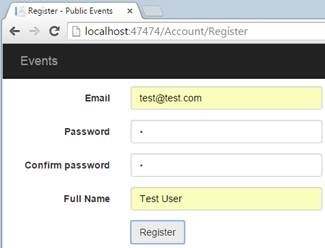
10. Now run the application and try to register a new user account. It should work correctly:
Step 7. Fill Sample Data in the DB (Seed the Database)
You are ready to fill the database with sample data. Sample data will help during the development to simplify testing. Now let’s fill some data: create admin account and a few events with few comments. The easiest way to do this is to create a Seed() method in the database migration strategy.
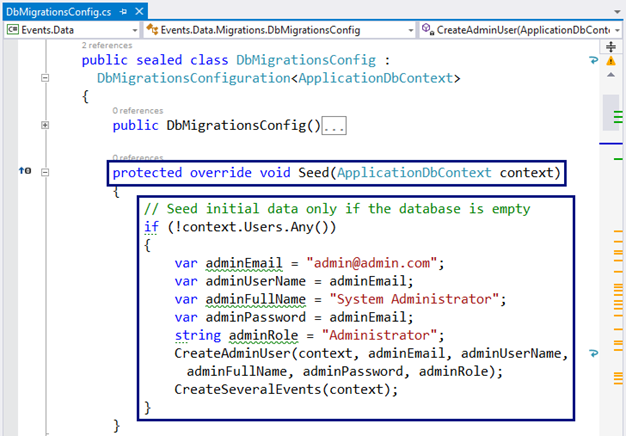
1. In the Seed() method check whether the database is empty. If it is empty, fill sample data. The Seed() method will run every time when the application starts, after a database schema change. You can use sample code like this:
In this example, the default administrator user will be “[email protected]” with the same password. This will simplify testing, because some actions require administrator privileges in the system.
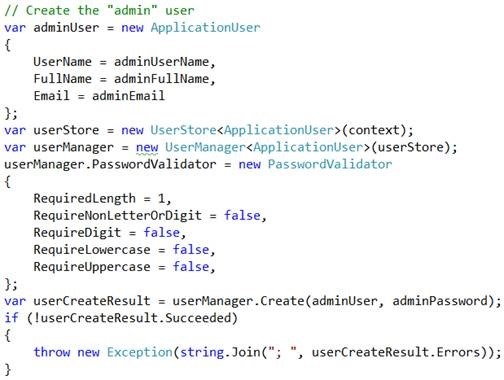
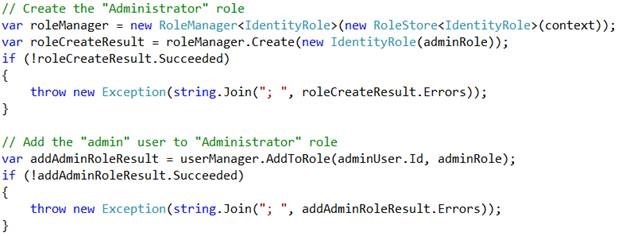
2. Now, let’s create the admin user and the administrator role and assign administrator role to the admin user:
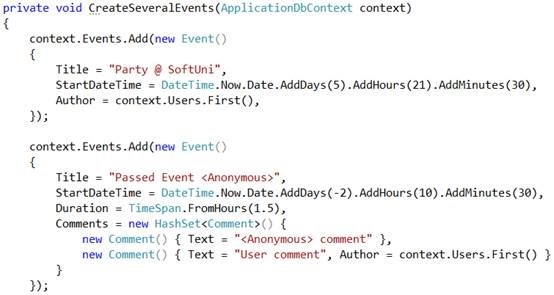
3. Next, create some events with comments:
4. Add some code to create a few more events:
· Few upcoming events
· Few passed events
· Few anonymous events (no author)
· Events with / without comments
5. Drop the database and restart the Web application to re-create the DB.
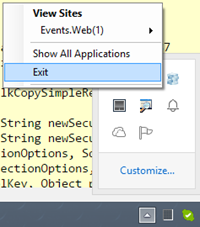
If you get “Cannot open database” error, stop the IIS Server, rebuild and run the MVC application again:
Stopping the IIS Express web server (Internet Information Services):
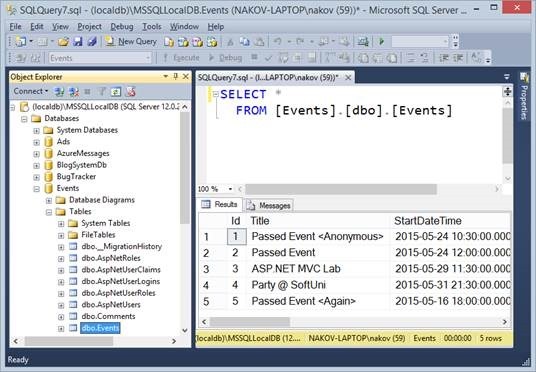
6. Check the data in the Events database. It should hold few records in the Events, Comments, AspNetUsers, AspNetRoles and AspNetUserRoles:
Now you have sample data in the Events database and you are ready to continue working on the Events management MVC Web application.
Step 8. List All Public Events at the Home Page
Listing all public events at the home page passes through several steps:
· Create EventViewModel to hold event data for displaying on the home page.
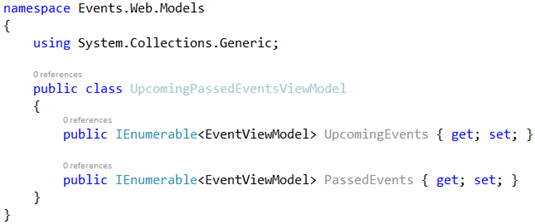
· Create UpcomingPassedEventsViewModel to hold lists of upcoming and passed events.
· Write the logic to load the upcoming and passed events in the default action of the HomeController.
· Write a view to display the events at the home page.
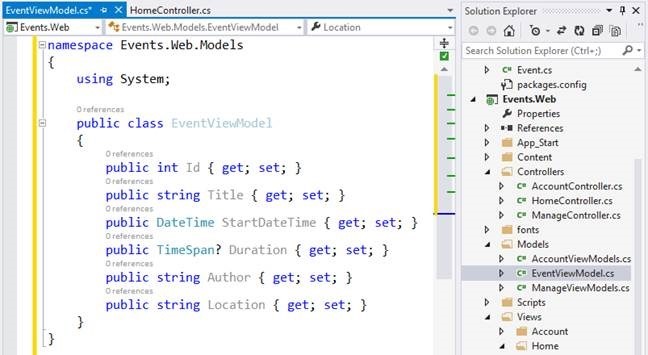
1. Create a class Models\EventViewModel.cs to hold event data for displaying on the home page:
2. Create a class Models\UpcomingPassedEventsViewModel.cs to hold lists of upcoming and passed events:
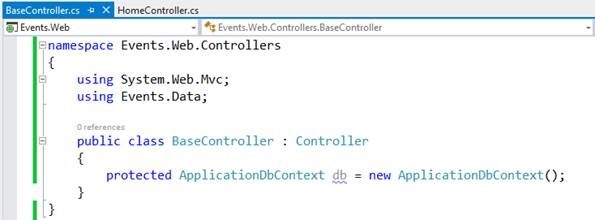
3. Create a class Controllers\BaseController.cs to hold the Entity Framework data context. It will be used as base (parent) class for all controllers in the MVC application:
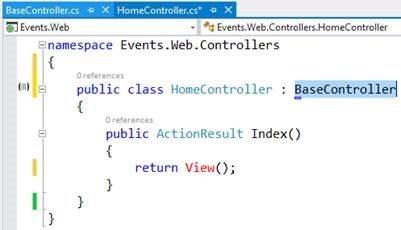
4. First extend the BaseController from the HomeController to inherit the DB context:
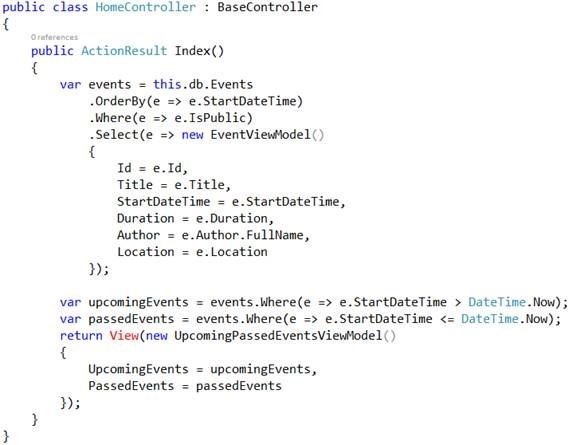
5. Now write the code in the default action Index() of the HomeController to load all public events:
The idea of the above code is to select all public events, ordered by start date, then transform them from entity class Event to view model class EventViewModel and split them into two collections: upcoming and passed events.
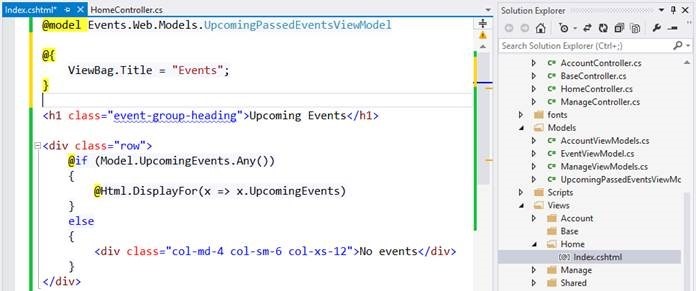
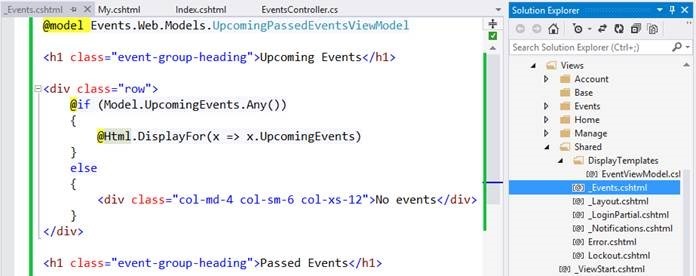
6. Finally, create the view to display the events at the home page – \Views\Home\Index.cshtml:
7. The above code shows the upcoming events only. Add similar code to list the passed events as well.
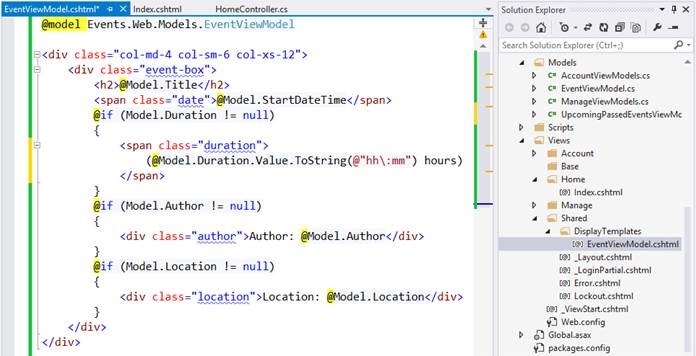
8. You need to define a display template for the EventViewModel class. It will be used when the Razor engine renders this code: @Html.DisplayFor(x => x.UpcomingEvents). Create the display template in the file\Views\Shared\DisplayTemplates\EventViewModel.cshtml:
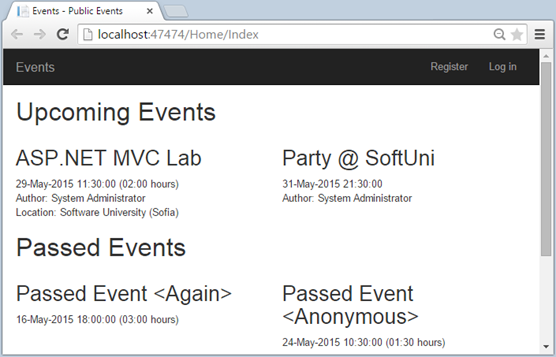
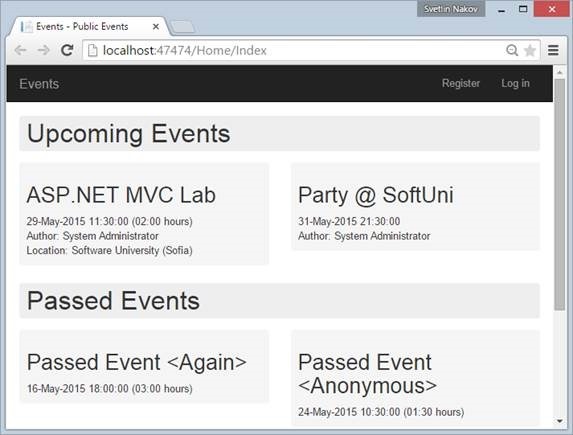
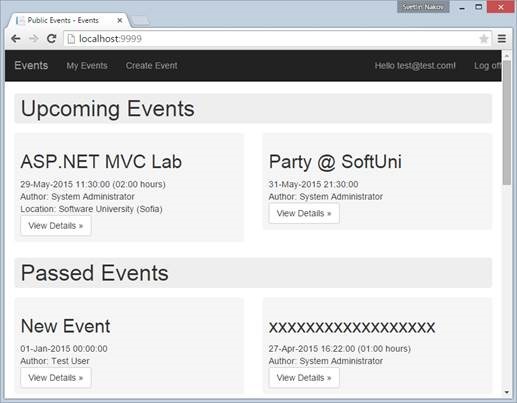
9. Build and run the project to test whether it works correctly. If you have a luck, the code will be correct at your first attempt. The expected result may look like this:
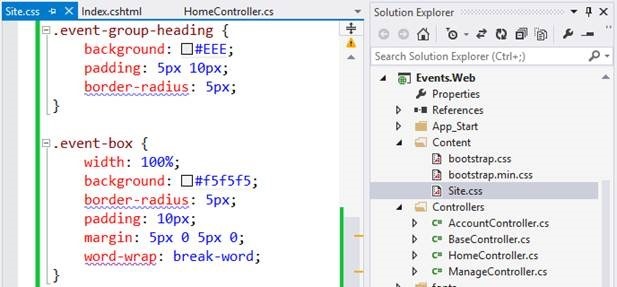
10. Now let’s add some CSS styles to make the UI look better. Append the following CSS style definitions at the end of the file \Content\Site.css:
11. Refresh the application home page to see the styled events:
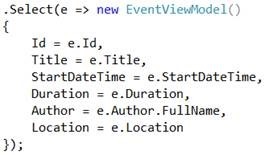
12. Good job! Events are displayed at the home page. Now let’s optimize a bit the HomeController. It holds a code that loads an Event object into a new EventViewModel object:
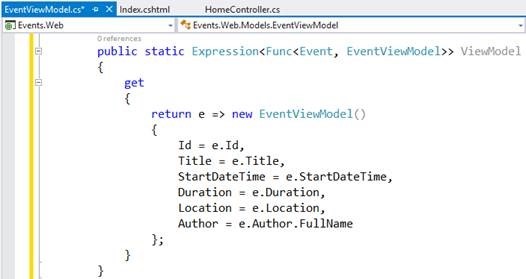
This code can be moved to the EventViewModel class to make the HomeController cleaner:
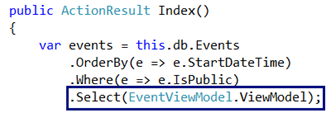
Looks complex, but it is not really. This static property is used in .Select(…) queries to transform Event into EventViewModel. Such transformations are boring and work better encapsulated in the view model class. Now the HomeController can use this static property as follows:
13. Build and test the project again to ensure it woks correctly after the refactoring.
Step 9. List Events Details with AJAX
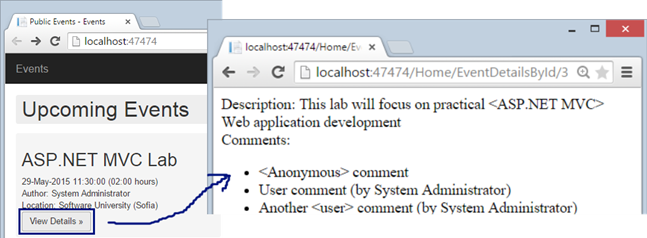
The next step in the development of the Events management application is to display event details dynamically with AJAX. The goal is to achieve the following functionality:
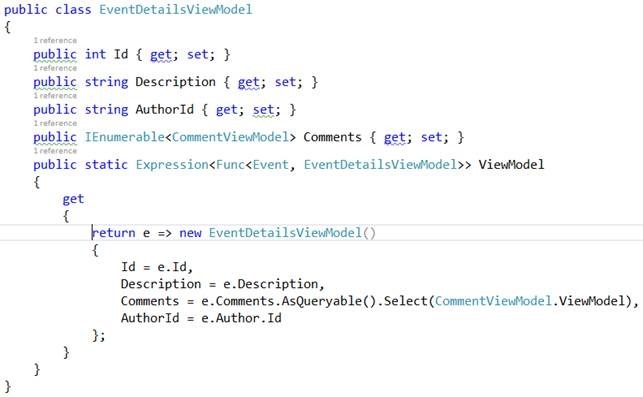
1. First, let’s define the EventDetailsViewModel class that will hold the event details:
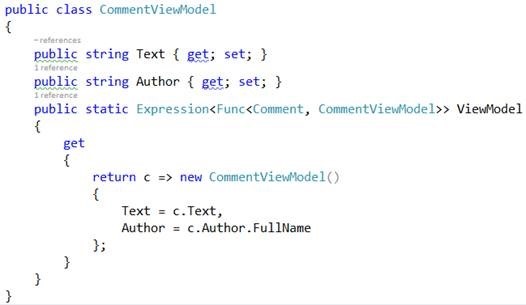
It will internally refer the CommentViewModel class:
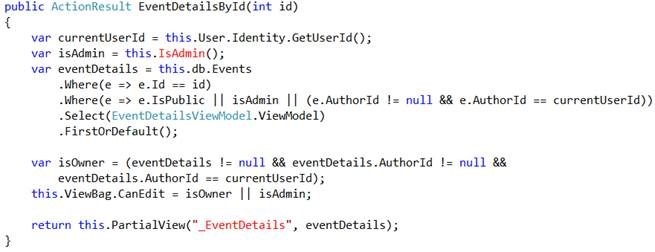
2. Next, let’s write the AJAX controller action, that will return the event details when users click the [View Details] button:
The above logic is not quite straightforward, because event details should be shown only when the user has permissions to access them:
· The event author can view and edit its own events (even private).
· System administrators can view and edit all events (even private).
· Public events are visible by everyone, but not editable by everyone.
3. It is quite good idea to extract the check whether the current user is administrator in the BaseController:
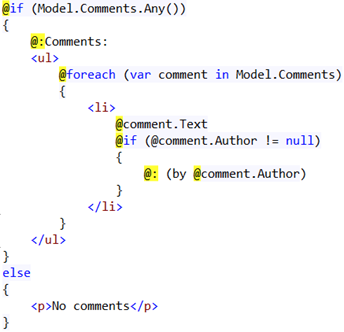
4. Next, let’s create the partial view that will be returned when the AJAX request for event detail is made. The partial view for the above AJAX action should stay in \Views\Home\_EventDetails.cshtml.
First, display the event description:
Next, list the event comments:
Finally, show [Edit] and [Delete] buttons when the user has edit permissions:
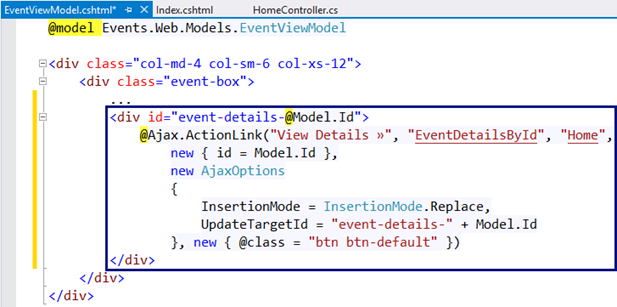
5. Now, let’s edit the events display template \Views\Shared\DisplayTemplates\EventViewModel.cshtml and add the AJAX call in it:
6. Let’s test the new functionality. Everything works fine, except that the AJAX action link is executed as normal link without AJAX:
7. What is missing? The script that handle the AJAX calls are not loaded in the page. Let’s add it.
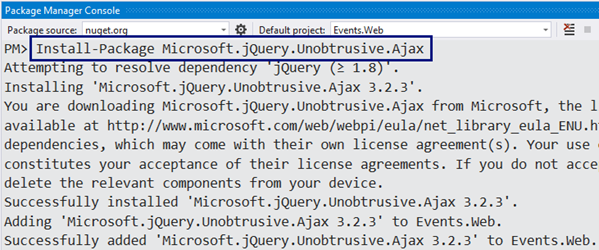
· First, install the NuGet package Microsoft.jQuery.Unobtrusive.Ajax in the project Events.Web:
· Register the Unobtrusive AJAX script in the bundles configuration file App_Start\BundleConfig.cs, just after the jQuery bundle registration:
· Include the unobtrusive AJAX script in the view which needs AJAX: \Views\Home\Index.cshtml
This code will render the “~/bundles/ajax” bundle in the section “scripts” in the site layout:
8. Now the AJAX functionality should work as expected:
The network requests in the Web browser developer tools shows that the AJAX call was successfully executed:
Step 10. Create New Event
The next feature to be implemented in the Events management system is “Create New Event“. This will require creating a “New Event” form (Razor view) + input model for the form + controller action to handle the submitted form data.
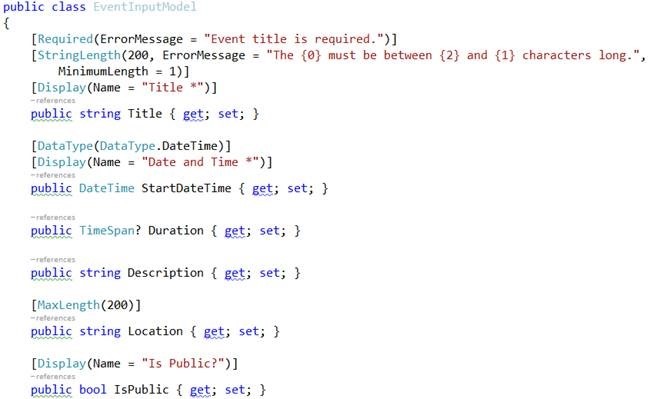
1. First, let’s define the input model for the create or edit event form. It will hold all event properties that the user will fill when creating or editing an event. Let’s create the class Models\EventInputModel.cs:
It is a good idea to attach validation annotations like [Required] and [MaxLength] for each property to simplify the validation of the form.
2. Next, let’s create the “New Event“ form. The easiest way to start is by using the Razor view generator in Visual Studio. Create a folder “\Views\Events“. Right click on the “Events” folder and choose [Add] à [View…]:
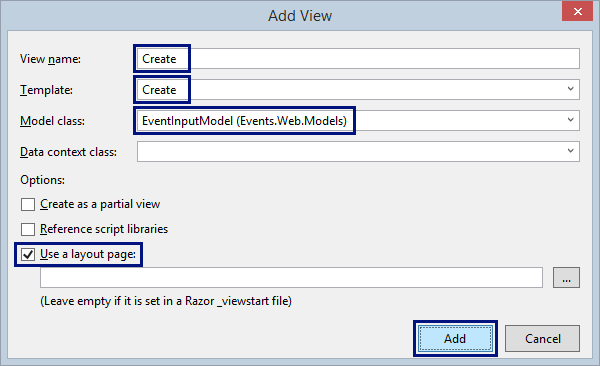
Enter a view name “Create“. Select template “Create“. Select the model class “EventInputModel (Events.Web.Models)“. Click [Add] to generate the view:
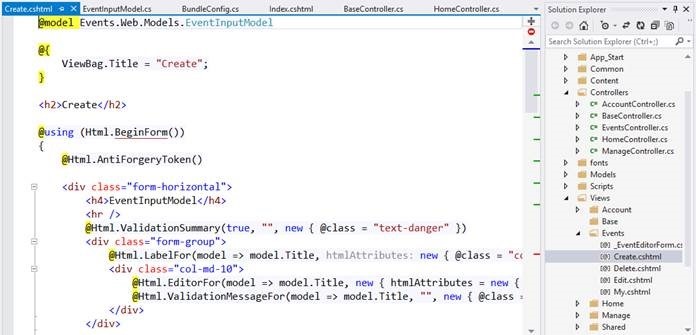
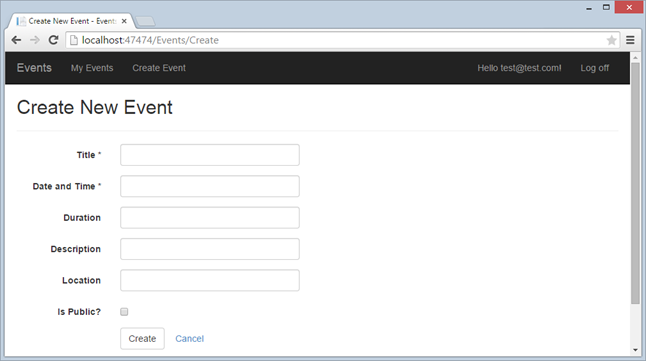
Visual Studio will generate the “Create Event” form:
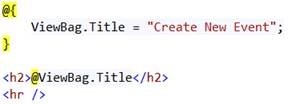
3. Now customize the generated form. Change several things:
· Change the Title à “Create Event”
· Remove the “Back to List” link:
· Add [Cancel] link to “My Events”, just after the [Create] button:
4. Create EventsController to handle the actions related to events: create / edit / delete / list events.
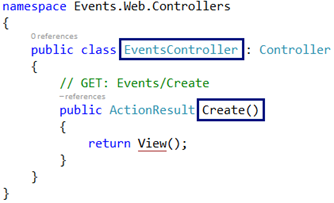
5. Add the “Create” action (HTTP GET) to display the “New Event” form:
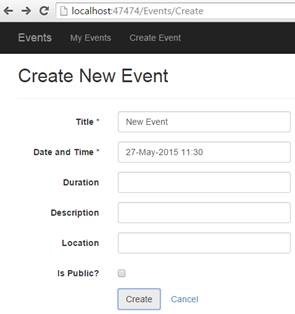
6. Build the project, run it and test the new functionality (login and click [Create Event]). The “New Event” form should be rendered in the Web browser:
Create New Event Logic
After the “Create New Event” form is ready, it is time to write the logic behind it. It should create a new event and save it in the database. The correct way to handle form submissions in ASP.NET MVC is by HTTP POST action in the controller behind the form. Let’s write the “Create New Event” logic.
1. First, extend the BaseController to inherit the database context:
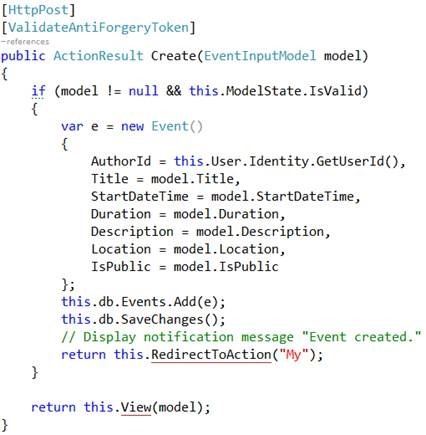
2. Next, write the action to handle POST \Events\Create:
3. Run and test the code. Now creating events almost works:
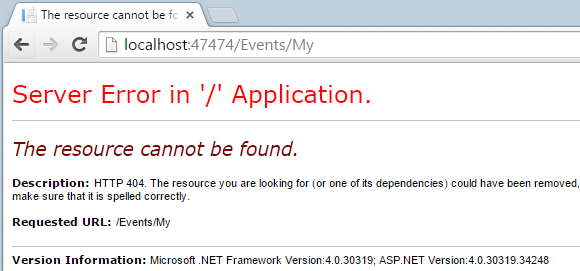
When the form is submitted, the result will be like this:
This is quite normal. The “My” action in the EventsController is not missing.
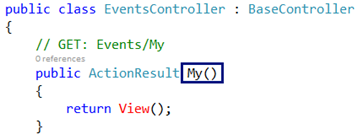
4. Let’s define the action “My” and the view behind it in the EventsContoller:
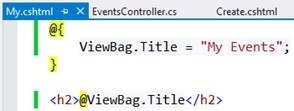
Create an empty view \Views\Events\My.cshtml (it will be implemented later):
5. Now run and test the application again:
Check the database to see whether the new event is created:
6. At the home page the new event is not listed. Why? The event is not public. Let’s make the “Is Public?” check box in the “New Event” form checked by default:
Step 11. Notification System (Info / Error Messages)
The next big step will be to add a notification system to display informational and error messages like these:
Typically, MVC controller actions that modify DB objects (e.g. EventsController.Create) work as follows:
· Check the model state. If the validation fails, the model state will be invalid and the controller will re-render the form. The form will show the errors for each incorrect field.
· If the model state is correct, create / edit the database object behind the form.
· Add a notification message to be shown at the top of the next page shown in the Web application.
· Redirect to another page that lists the created / modified DB object.
As the “Post-Redirect-Get” pattern says, in Web applications it is highly recommended to redirect to another page after executing an action that changes something at the server side:http://en.wikipedia.org/wiki/Post/Redirect/Get.
The missing part in ASP.NET MVC is the notification system, so developers should either create it, or use some NuGet package that provides notification messages in ASP.NET MVC. Let’s install and use the NuGet packageBootstrapNotifications:
1. From the package management console in Visual Studio install the NuGet package BootstrapNotifications in the Events.Web project:
NuGet will add the class Extensions\NotificationExtensions.cs:
NuGet will also add a partial view \Views\Shared\_Notifications.cshtml:
2. To display the notification messages (when available) at the top of each page in the MVC project, render the _Notifications partial view in the site layout, just before the @RenderBody():
3. Put notifications in the controller actions after successful database change.
Use NotificationType.INFO for information messages (success) and NotificationType.ERROR for error messages. Not that these notifications will render after the first redirect to another page, because the implementation relies on the TempData dictionary in ASP.NET MVC.
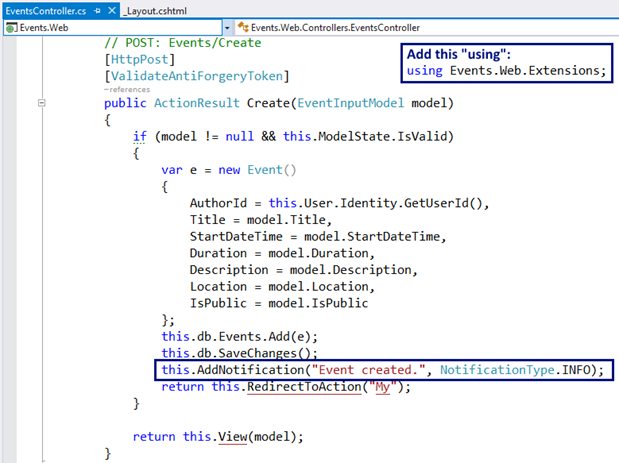
Add notification messages after db.SaveChanges() in the actions that change the database, followed by RedirectToAction(…):
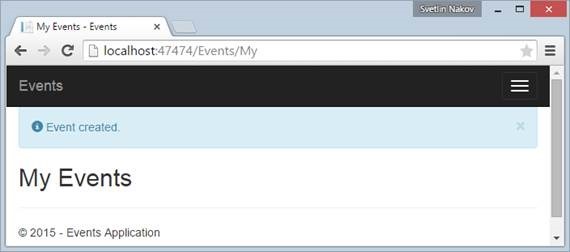
4. Run and test the application. Create an event to see the “Event created.” notification message:
This looks a bit ugly, so add a fix in the \Content\Site.css:
5. Save the changes, refresh the site with [Ctrl + F5] and create a new event to test the changes:
Step 12. Date / Time / Duration UI Controls
The “New Event” form displays fields for entering date + time and duration. Currently the editor for these fields is not user-friendly. The date format is unclear and there is not calendar control. Let’s fix this. Let’s add “date-time picker” for the date and duration fields:
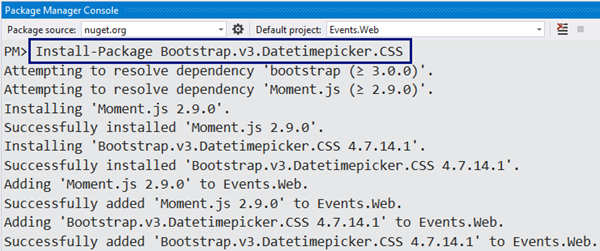
1. Install the NuGet package “Bootstrap.v3.Datetimepicker.CSS“:
It will add the following files to your MVC project:
· \Scripts\bootstrap-datetimepicker.js
· \Scripts\moment.js
· \Content\bootstrap-datetimepicker.css
These files should be includes in all pages that use the date-time picker.
2. Create CSS and JavaScript bundles for the date-time picker:
3. Create a placeholder for the CSS bundles in the _Layout.cshtml:
It will be used later to inject the date-time picker’s CSS from the events editor form.
4. Add the date-time picker’s scripts and CSS files in the “New Event” form, in \Views\Create.cshtml:
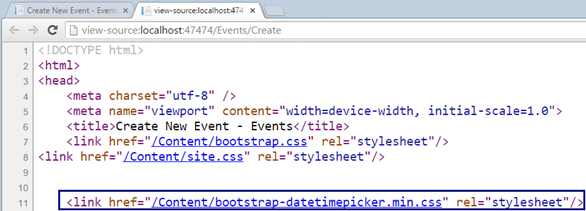
This code will inject the specified CSS from the bundles in the page header:
It will also inject the specified JavaScript from the bundles at the end of the page:
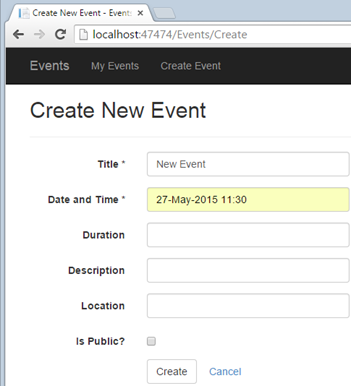
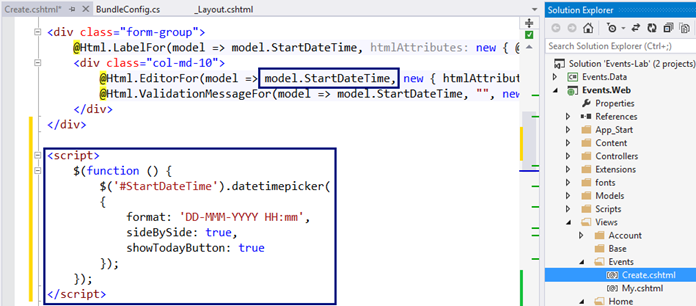
5. Now the site is ready to add the date-time picker in the “New Event” form. Let’s try to attach the date-time picker for the field “StartDateTime” in \Views\Events\Create.cshtml:
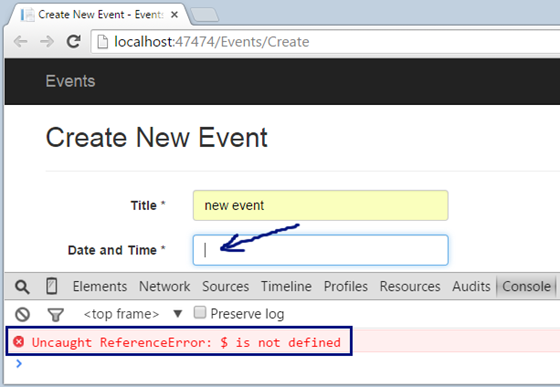
6. Now rebuild the project and run the code to test the new functionality. It does not work due to JavaScript error:
7. Seems like jQuery is not loaded. This is because the script for attaching the datetimepicker for the StartDateTime field uses jQuery, but the jQuery library loads later, at the end of the HTML document. This is easy to fix, just move the jQuery reference at the start of the HTML code in _Layout.cshtml:
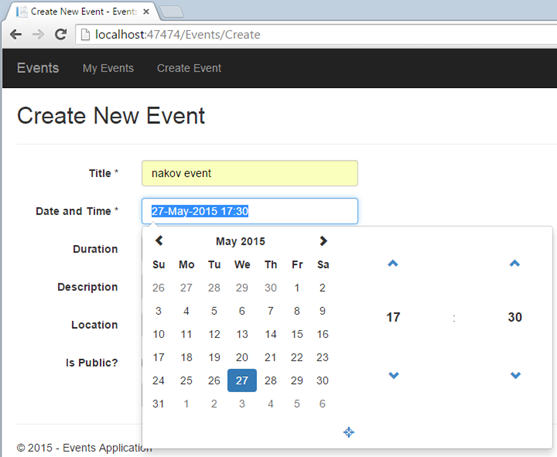
8. Now rebuild the project and run the code to test again the new functionality. It should now work correctly:
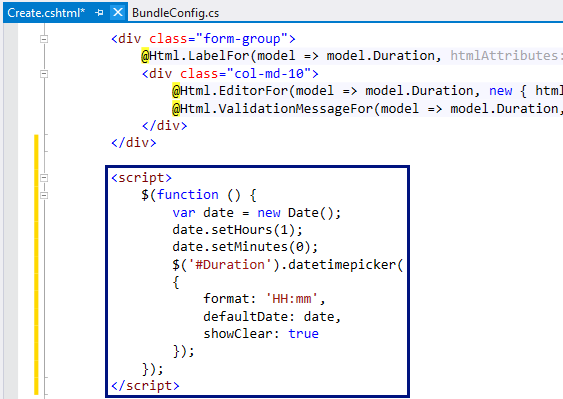
9. In similar way, add a time picker for the “Duration” field:
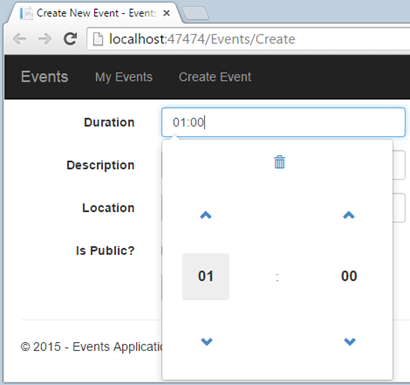
10. Test the new duration picker by starting the Web application:
Step 13. Client-Side Unobtrusive Validation
Now the “New Event” form works as expected. There is a small UI problem: when invalid data is entered, the form validation is executed at the server side and the user sees the validation errors after post-back, with a small delay.
Let’s try to add client-side form validation. This is really easy, just insert the Microsoft jQuery Unobtrusive validation JavaScript bundle at the page holding the form:
Test the “New Event” form to ensure the validation is now client side.
Step 14. List My Events
Now let’s list current user’s events at its personal events page: \Events\My.
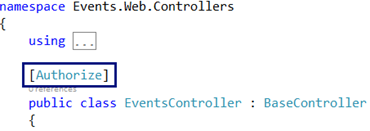
1. First, add [Authorize] attribute in the EventsController:
The [Authorize] attribute will redirect the anonymous users to the login form. It says that all controller actions of the EventsController can be accessed by logged-in users only.
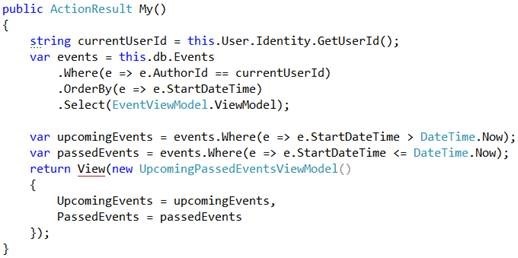
2. Next, add the HTTP GET controller action “My” in EventsController that will display current user’s events:
3. Finally, create the view My.cshtml behind the above action. It is essentially the same like the Index.cshtml view of the HomeController, right? Duplicating code is very bad practice, so let’s reuse the code. First, extract a partial view \Views\Shared\_Events.cshtml, then reference it from \Views\Events\My.cshtml and again from \Views\Home\Index.cshtml:
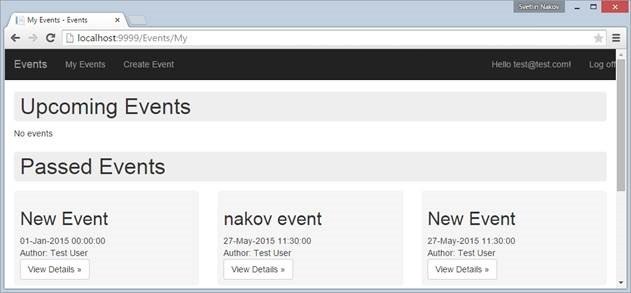
4. Test the new functionality “My Events“, as well as the old functionality “Home Page“:
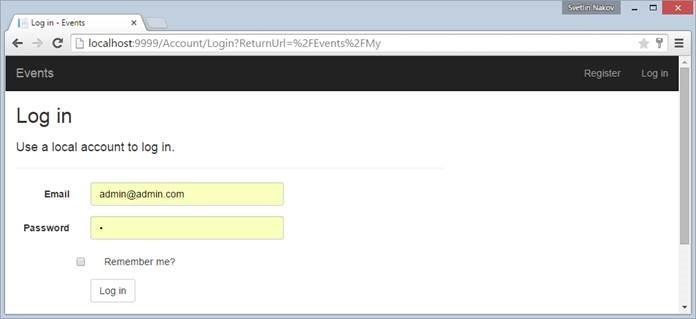
5. Try also to access “My Events” for anonymous user. The application should redirect you to the login page:
Step 15. Edit Existing Event Form
The “Edit Event” functionality is very similar to “Create Event“. It uses the same input model Events.Web.Models.UpcomingPassedEventsViewModel. Create a view \Views\Events\Edit.cshtml and reuse the logic from \Views\Events\Create.cshtml by extracting a partial view \Views\Events\_EventEditorForm.
Step 16. Edit Existing Event Logic
Write the controller action for editing events in the EventsController.
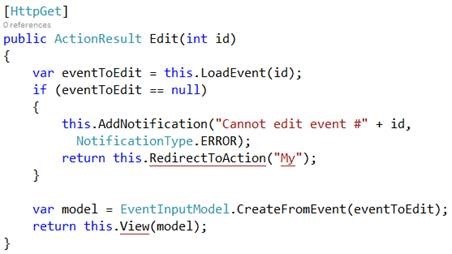
1. Write a HTTP GET action “Edit” to prepare the form for editing event. In case of invalid event ID, show an error message and redirect to “My Events“:
2. The logic in LoadEvent(id) method loads an existing event in case the user has permissions to edit it:
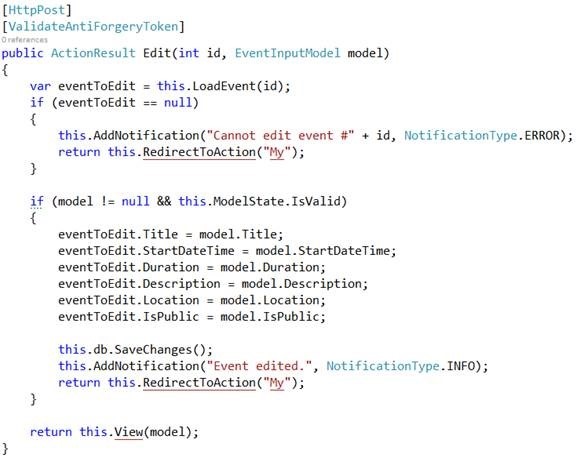
3. Write a HTTP POST action “Edit” to save the changes after submitting the event editing form. It should first check the event ID and show an error of case of non-existing event or missing permissions. Then it checks for validation errors. In case of validation errors, the same form is rendered again (it will show the validation errors). Finally, the Edit method modifies the database and redirects to “My Events“:
4. Run and test the new functionality “Edit Event” by opening \Events\Edit\3.
Step 17. Handling HTML Special Characters
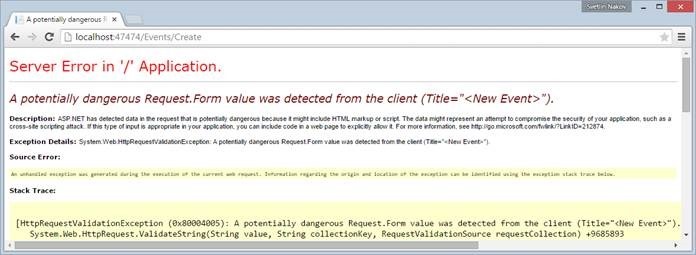
Try to create an event named “<New Event>“:
It will fail, because by default ASP.NET MVC does not allow forms to send HTML tags in the fields values. This is to help protecting from Cross-Site Scripting (XSS) attacks. You will see an ugly error page:
This is very easy to fix, just add [ValidateInput(false)] attribute in the BaseController:
Step 18. Delete Existing Event Form
Create a form and controller action, similar to “Edit Event”. The form should load the event data in read-only mode with [Confirm] and [Cancel] buttons.
Step 19. Delete Existing Event Logic
The logic behind the “Delete Event” from is similar to “Edit Event”. Try to implement is yourself.
Step 20. Add Comments with AJAX
For each comment implement [Add Comment] button that shows (with AJAX) a new comment form. After the form is submitted, it creates a comment and appends it after the other comments for the current event. Comments can be added by the currently logged-in user and anonymously (without login).
Step 21. Delete Comments
Comments can be deleted only by their author (owner) and by administrators. Display [Delete] button right after each comment in the events (if deleting is allowed). Clicking [Delete] should delete the comment after modal popup confirmation.
Step 22. Add Paging
Implement paging for the events. Display 15 events per page. At each page display the pager holding the number of pages as well as [Next Page] / [Previous Page] links.
Step 23. Upload and Display Event Image
Modify the “Create Event” form to upload an image for the event (optionally). The image should be at most 100 KB, max width 400, max height 400, min width 100 and min height 100 pixels. Images should be gif, png orjpeg files, stored in the file system, in files named like this: event-185.png. Hold the images in a directory “~/Images“. Protect the directory to disable direct HTTP access to it.
Create an action /event/image/{id} to download and display an event image. It should read the image from the file system and display it if the user is allowed to view it (owner or administrator or public event).
Modify the event listing views to display the image for each event (when available). Use max-width and max-height attributes to ensure the image will resize correctly for different sizes of its container.
The Full Source Code of the Events MVC Application
Download the fully-functional application source code here: https://softuni.bg/trainings/24/ASP-NET-MVC-May-2015 (see section “Lab”).


































39 Responses to “ASP.NET MVC Practical Hands-On Lab Tutorial (Free from the Software University)”
Може би е добра идея да се включи и AngularJs към един такъв туториал, и там да се разгледа пак фронт-енд MVC дизайна на ангулар и как може да се ползва той за хибридни mobile apps с asp.net. Това би запалило повече хора по ASP.NET MVC 🙂
Да, има още какво да се добави, включително за AngularJS, нали имаме цял курс за него в СофтУни…
Това са първите 55 страници. За повече не стигне времето. Написах ги само за 4 дни усилена работа. Гледам за всеки курс да пускам по един такъв лаб, за да може хората да минат през него и да почувстват технологията в ръцете си.
Много по-силно е сам да си напишеш проекта (макар и следвайки готови стъпки), вместо да гледаш как някой друг пише код пред тебе на живо. Лека полека в СофтУни ще правим все повече такива практически step-by-step учебни материали, лабове и самоучители, за да се вдигне нивото на успеваемост сред студентите.
Загрижен съм, че само 30% от нашите студенти завършват. Останалите се отказват защото им е трудно или не им стига времето.
good idea to have — https://softuni.bg/trainings/24/ASP-NET-MVC-May-2015#
I went to the LAB section , and download the zip folder a few time
but somehow it cannot even about to unzip, then copy and paste to another folder successfully — it is kind of SCAM
so it is BAD < very BAD
This is an excellent tutorial. Would you please re-submit the code download as the files cannot be unzipped. Thanks.
The ZIP file with the Lab source code works perfectly fine: https://softuni.bg/downloads/svn/aspnet-mvc/May-2015/10.%20Events-Lab.zip
Thanks nakov for re-submitting the download. The issue is not with the code. I simply cannot unzip the zip file – there is an ‘unexpected error’ preventing the file from unzipping. Any ideas? Kind Regards. Walter.
Thanks for this great post, but it looks like i have a problem too with unzipping the file 🙁
I just unzipped it successfully with 7zip, with winrar im getting errors, so
@Walter, you can try the same if you havent got the file by now. Thanks again for this.
@V Thank you. 7Zip worked for me too. Thanks for sharing your discovery. Thanks @nakov for the Lab.
Hi there, thanks for the lab, it has been a great help.
Just wondering, when i change the code in CreateSeveralEvents method in DbMigrationsConfig, it is not implementing once I launch the solution on any browser. I.e. if I change “Party @ Softuni” to “test”, it does not change. Any suggestions for a beginner? Many thanks.
The CreateSeveralEvents() method in the database migrations runs once, when the database is first created. The easiest way to re-create the events is to DROP the entire database and it will be created again.
U said that code duplicating is very bad practice but u have duplicated code in Home controller’s Index method and Events controller’s My method. What if i have 10 view pages then i have to put same code in all 10 controller to show on view page.how to resolve this ???
The object-oriented programming says that common logic should be moved to base classes and specific logic should stay in child classes. In our case you should have BaseController (base, parent class) to hold the shared code and seveal child cntroller (child, derived classes) to hold the page-specific code.
Hi,
I really appreciate the way you present the thing but it would looks more fine if you’ll consider update your article using a DI container like (Ninject, Unity).
hi.. 🙂
pls send me a link to create comment pls. in Step20.
Details Of The Md Science Lab Max Load
[…] ²Ð¸ ÑÑÑпки), вмеÑÑо да Ð³Ð»ÐµÐ´Ð°Ñ ÐºÐ°Ðº нÑкой дÑÑг пР[…]
Thanks nakov for your time. God bless.
Sorry, I meant Nakov*.
Practical Microsoft Visual Studio 2015
[…] µÑки step-by-step ÑÑебни маÑеÑиали, лабове и ÑÐ°Ð¼Ð¾Ñ […]
Thank you for this tutorial, I have one question : where can I find the Events databases ?
Opps sorry, It will be create automatically
Beginning Aspnet 20 Databases
[…] ¸), вмеÑÑо да Ð³Ð»ÐµÐ´Ð°Ñ ÐºÐ°Ðº нÑкой дÑÑг пиÑе код п […]
i am hvaing this error.
System.Exception: Name [email protected] is already taken.
Practical Aspnet Web Api
[…] ли, лабове и самоучители, за да се вдигне нив […]
Thank you for sharing. How I can add Event Attendee and too users can registering for a event as Attendee
Any Idea?? Please
Thanks
when I Build and run Step 8.9 Not display Events only Id of Upcoming and Passed Events. please solve the issue
I had the same issue, I figured out that Your ‘Display Templates’ folder holding the EventViewModel.cshtml file must be named ‘DisplayTemplates’ without the SPACE between Display and Templates.
when events and comments table were not created, I deleted the database. I am using the localdb. Now when I am running the app again, It’s not creating the db again. Now how to solve it ?
Hi, How Are You?
I have the ability to enter new potential customers to your business.
When would it be possible for You to talk?
Guy
[…] https://nakov.com/blog/2015/05/28/free-asp-net-mvc-hands-on-lab/ […]
In step 16 inside step (1) EventInputModel.CreateFromEvent(eventToEdit) in this line i have error CreateFromEvent
Hey, have u got its solution, if yes so pls. share
in step no.7 we declared CreateAdminUser(context, adminEmail, adminUserName, adminFullName, adminPassword, adminRole) but we didnot define any function for the same in the code like we did for createseveralevents in image060. i dont get output from step no 7 the event db does not have any data in events table. can any one help me in this thing.
yes ishan i am facing same issue.
Here is i found the solution-
namespace Events.Data.Migrations
{
using System;
using System.Collections.Generic;
using System.Data.Entity.Migrations;
using System.Linq;
using Microsoft.AspNet.Identity;
using Microsoft.AspNet.Identity.EntityFramework;
public sealed class DbMigrationsConfig : DbMigrationsConfiguration
{
public DbMigrationsConfig()
{
AutomaticMigrationsEnabled = true;
AutomaticMigrationDataLossAllowed = true;
}
protected override void Seed(ApplicationDbContext context)
{
// Seed initial data only if the database is empty
if (!context.Users.Any())
{
var adminEmail = “[email protected]”;
var adminUserName = adminEmail;
var adminFullName = “System Administrator”;
var adminPassword = adminEmail;
string adminRole = “Administrator”;
CreateAdminUser(context, adminEmail, adminUserName, adminFullName, adminPassword, adminRole);
CreateSeveralEvents(context);
}
}
private void CreateAdminUser(ApplicationDbContext context, string adminEmail, string adminUserName, string adminFullName, string adminPassword, string adminRole)
{
// Create the “admin” user
var adminUser = new ApplicationUser
{
UserName = adminUserName,
FullName = adminFullName,
Email = adminEmail
};
var userStore = new UserStore(context);
var userManager = new UserManager(userStore);
userManager.PasswordValidator = new PasswordValidator
{
RequiredLength = 1,
RequireNonLetterOrDigit = false,
RequireDigit = false,
RequireLowercase = false,
RequireUppercase = false,
};
var userCreateResult = userManager.Create(adminUser, adminPassword);
if (!userCreateResult.Succeeded)
{
throw new Exception(string.Join(“; “, userCreateResult.Errors));
}
// Create the “Administrator” role
var roleManager = new RoleManager(new RoleStore(context));
var roleCreateResult = roleManager.Create(new IdentityRole(adminRole));
if (!roleCreateResult.Succeeded)
{
throw new Exception(string.Join(“; “, roleCreateResult.Errors));
}
// Add the “admin” user to “Administrator” role
var addAdminRoleResult = userManager.AddToRole(adminUser.Id, adminRole);
if (!addAdminRoleResult.Succeeded)
{
throw new Exception(string.Join(“; “, addAdminRoleResult.Errors));
}
}
private void CreateSeveralEvents(ApplicationDbContext context)
{
context.Events.Add(new Event()
{
Title = “Party @ SoftUni”,
StartDateTime = DateTime.Now.Date.AddDays(5).AddHours(21).AddMinutes(30)
});
context.Events.Add(new Event()
{
Title = “Party “,
StartDateTime = DateTime.Now.Date.AddDays(7).AddHours(23).AddMinutes(00),
Comments = new HashSet() {
new Comment() { Text = “User comment”, Author = context.Users.First() }
}
});
context.SaveChanges();
}
}
}
namespace Events.Data.Migrations
{
using Microsoft.AspNet.Identity;
using Microsoft.AspNet.Identity.EntityFramework;
using System;
using System.Collections.Generic;
using System.Data.Entity;
using System.Data.Entity.Migrations;
using System.Linq;
public sealed class DbMigrationsConfig : DbMigrationsConfiguration
{
public DbMigrationsConfig()
{
AutomaticMigrationsEnabled = true;
AutomaticMigrationDataLossAllowed = true;
}
protected override void Seed(ApplicationDbContext context)
{
// Seed initial data only if the database is empty
if (!context.Users.Any())
{
var adminEmail = “[email protected]”;
var adminUserName = adminEmail;
var adminFullName = “System Administrator”;
var adminPassword = adminEmail;
string adminRole = “Administrator”;
CreateAdminUser(context, adminEmail, adminUserName, adminFullName, adminPassword, adminRole);
CreateSeveralEvents(context);
}
}
private void CreateAdminUser(ApplicationDbContext context, string adminEmail, string adminUserName, string adminFullName, string adminPassword, string adminRole)
{
// Create the “admin” user
var adminUser = new ApplicationUser
{
UserName = adminUserName,
FullName = adminFullName,
Email = adminEmail
};
var userStore = new UserStore(context);
var userManager = new UserManager(userStore);
userManager.PasswordValidator = new PasswordValidator
{
RequiredLength = 1,
RequireNonLetterOrDigit = false,
RequireDigit = false,
RequireLowercase = false,
RequireUppercase = false,
};
var userCreateResult = userManager.Create(adminUser, adminPassword);
if (!userCreateResult.Succeeded)
{
throw new Exception(string.Join(“; “, userCreateResult.Errors));
}
// Create the “Administrator” role
var roleManager = new RoleManager(new RoleStore(context));
var roleCreateResult = roleManager.Create(new IdentityRole(adminRole));
if (!roleCreateResult.Succeeded)
{
throw new Exception(string.Join(“; “, roleCreateResult.Errors));
}
// Add the “admin” user to “Administrator” role
var addAdminRoleResult = userManager.AddToRole(adminUser.Id, adminRole);
if (!addAdminRoleResult.Succeeded)
{
throw new Exception(string.Join(“; “, addAdminRoleResult.Errors));
}
}
private void CreateSeveralEvents(ApplicationDbContext context)
{
context.Events.Add(new Event()
{
Title = “Party @ SoftUni”,
StartDateTime = DateTime.Now.Date.AddDays(5).AddHours(21).AddMinutes(30)
});
context.Events.Add(new Event()
{
Title = “Passed Party “,
StartDateTime = DateTime.Now.Date.AddDays(7).AddHours(23).AddMinutes(00),
Comments = new HashSet()
{
new Comment() {Text=” comment” },
new Comment() {Text=”User comment”, Author=context.Users.First() },
}
});
context.SaveChanges();
}
}
}
solution from step 20 – 23??
Hello,
I realize the code is a few years old, but any chance the project code can be made public pls? I tried to download via labs link (https://softuni.bg/downloads/svn/aspnet-mvc/May-2015/10.%20Events-Lab.zip), but website says “You do not have access to this resource”.
Thanks
Very detailed tutorial, I applied Drift Boss it and it worked!