

Creating an URL Shortener App in JavaScript: a Step-by-Step Project Tutorial
Today I started a new series of project-based video tutorials for software developers. My goal is to teach software development by building real-world projects, step-by-step, from zero to a fully functional app.
The “URL Shortener” App in JS
In this tutorial, I create a simple URL Shortener app using JavaScript. The app maps links entered by users to “short links“, which redirect to the original link. We will be using Node.js and Express.js for creating the server-side Web application and Pug as a template engine. This tutorial will be split into several parts, and in each part, we will further develop our project. In the end, we will have a fully functional app.
URL Shortener in JS: Part 1 – Building the App Structure
This is the first part of the “URL Shortener in JS” project tutorial. Watch my video lesson and follow the steps to build the app yourself:
The Source Code for “URL Shortener – Part 1”
You can play with the source code from this first part of the “URL Shortener in JS” tutorial here: https://replit.com/@nakov/URLShortener-Part-1.
URL Shortener: Tech Stack
We shall use the following technology stack to build the app:
- Language: JavaScript
- Platform: Node.js
- Framework: Express.js
- Architecture: Model-View-Controller (MVC)
- User interface: plain HTML + CSS
- Templating Engine: Pug
- Database: Firebase
- IDE: Repl.it (online dev environment)
The Model-View-Controller (MVC) Pattern
The URL Shortener JS app will use the classical Model-View-Controller (MVC) pattern for building server-side Web apps:
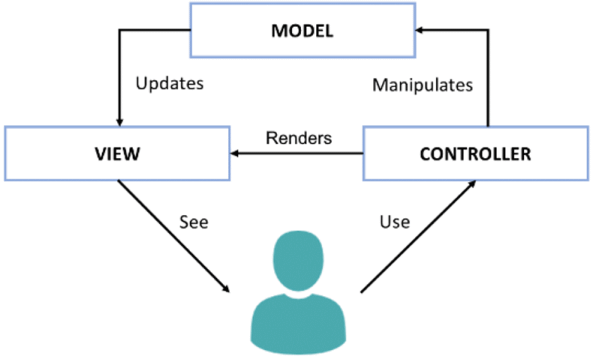
Controller
- Handles user actions
- Updates the model
- Renders the view (UI)
Model
- Holds data for the UI
View
- Displays the UI, based on the model data
Web Framework: Express.js
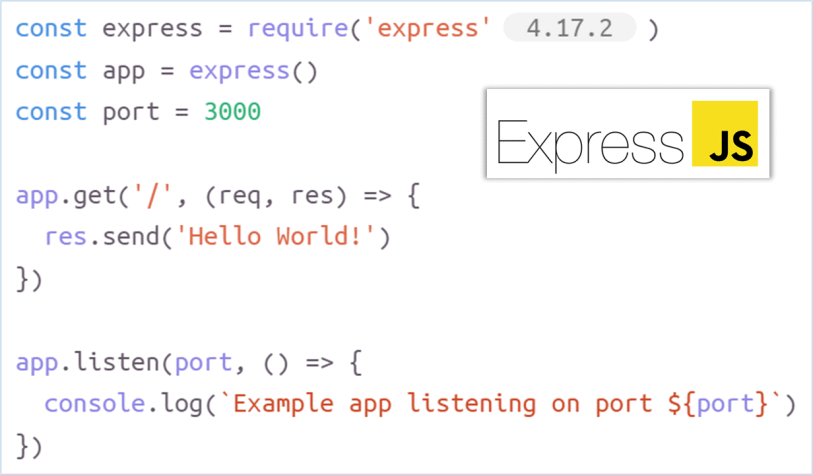
We shall use Node.js and the Express.js Web framework to build the server-side app logic. Express is a simple server-side MVC framework for building Web apps in JavaScript:
Templating Engines
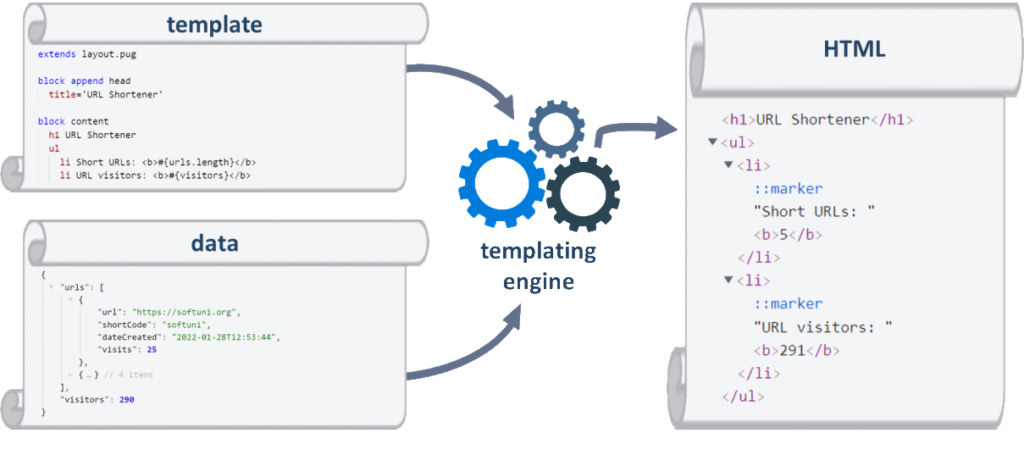
We’ll use a templating engine, to build the app UI (to render HTML by a set of templates). First, let’s review how templating engines work (as a concept):
The “Pug” Templating Engine
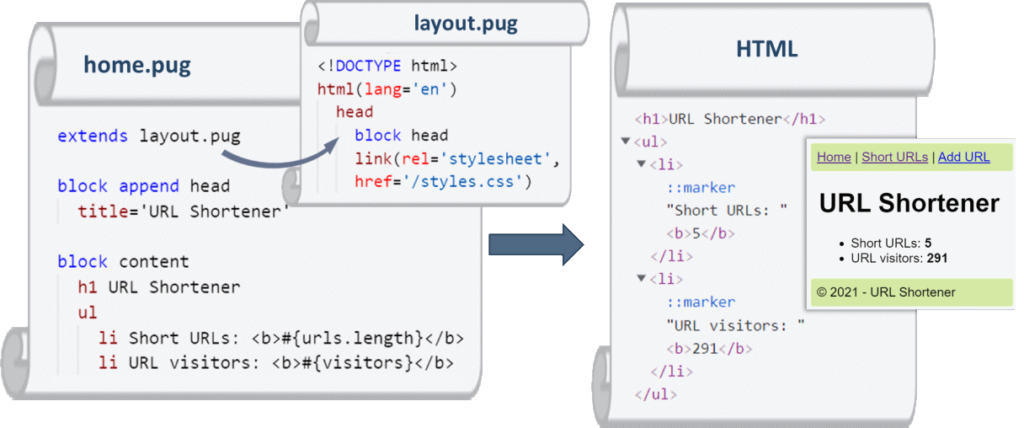
We shall use the “Pug” templating engine for JavaScript to build the app pages and the page layout. Pug simplifies writing HTML pages by using a minimalistic syntax for HTML tags. The diagram below explains briefly how Pug renders app pages:
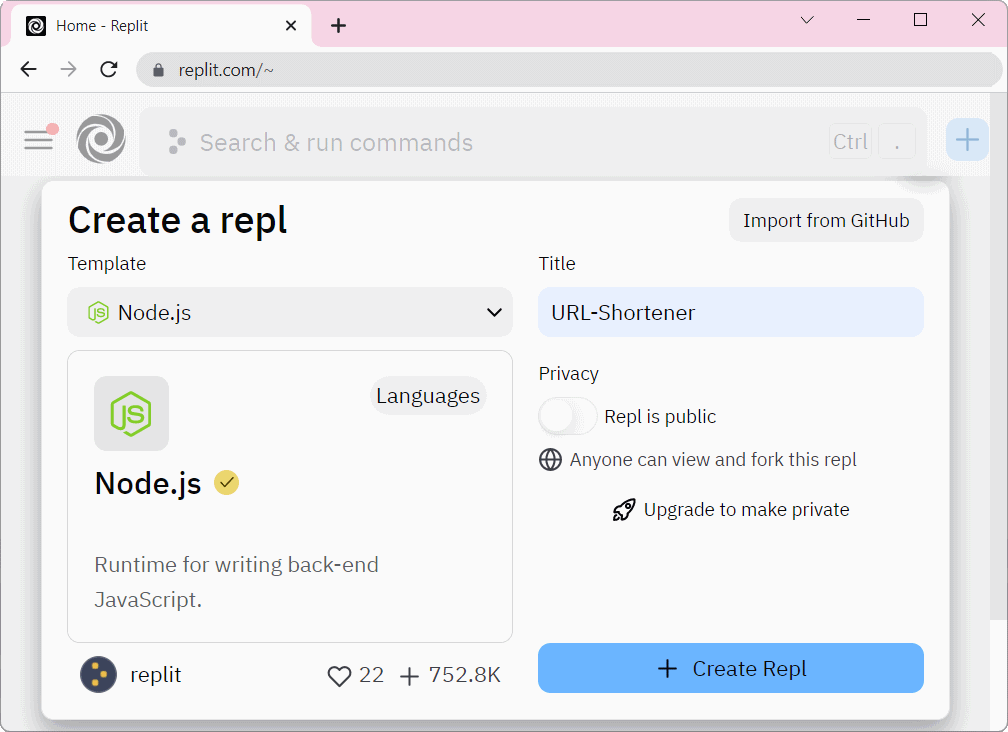
Start Building the “URL Shortener” App in Repl.it
First, we create a new Node.js app in repl.it (our online development environment for JavaScript):
In our main directory we have an index.js file that is automatically generated by repl.it:
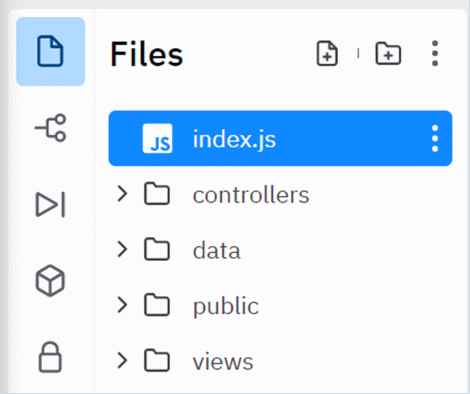
After we initialize our repl.it project, we split our code logic into different folders. We create folders for:
- data (it will hold the app data layer, which will hold the short URLs and will provide functions to retrieve / add / edit / delete them)
- controllers (it will hold the app MVC controllers, which will process the HTTP requests from the user’s Web browser)
- views (it will hold the app UI templates, which will render the pages)
- public (it will hold the app public static files, such as CSS, fonts, images, icons, etc.)
This is how our app structure should look in repl.it:
You don’t need to install manually any libraries because they will be added automatically when you start the project for the first time.
First, in our index.js we need to write the following code:
App Main Script: index.js
This is the entry point of the app. It initializes and starts the Web server at port 8080:
const express = require('express');
const app = express();
app.use(express.static('public'))
app.set('view engine', 'pug');

const data = require("./data/app-data");
data.seedSampleData();

const mvcController = require("./controllers/mvc-controller");
mvcController.setup(app, data);

let port = process.argv[2];
if (!port) port = process.env['PORT'];
if (!port) port = 8080;

app.listen(port, () => {
  console.log(`App started. Listening at http://localhost:${port}`);
})
.on('error', function(err) {
  if (err.errno === 'EADDRINUSE')
    console.error(`Port ${port} busy.`);
  else
    throw err;
});
- In the first row, we import the ExpressJS node module. Then we bind it to a constant and use it to make static our public folder. Doing this will allow us to use the public folder from any part of our application.
- We will also set our view engine to pug. This will render all .pug files we set as views.
- We define constant named data and invoke the function. seedSampleData() inside it. We will create them later. Every time our project is started this function will be initialized.
- Our next task is to tell the index.js that our MVC-controller exists and set up it.
- We set our virtual port for repl.it to 8080, and tell the program to listen to this port.
- If there is an error, it will be automatically displayed on the server’s console.
MVC Controller Actions: mvc-controller.js
This file holds the MVC controller actions, which will handle user HTTP requests (GET and POST):
function setup(app, data) {
  app.get('/', function(req, res) {
    let visitors = 0;
    for (const url of data.urls)
      visitors += url.visits;
    let model = { urls: data.urls, visitors };
    res.render('home', model);
  });
}

module.exports = { setup };
The MVC controller defines a function (action) to handle the requests for the app front page: HTTP GET /. It does the following:
- Counts the total number of URL visits.
- Prepares a model for displaying, which holds the URLs and the URL visits.
- Renders the home.pug template, which will visualize the data from the model.
App Data Layer: app-data.js
This file holds the app’s data layer. It will keep the URLs and their corresponding short URLs:
let urls = [];

function seedSampleData() {
  urls.length = 0; // cleanup
  urls.push({
    url: "https://softuni.org",
    shortCode: "su",
    dateCreated: new Date("2022-02-19T16:41:56"),
    visits: 86
  });
  urls.push({
    url: "https://nakov.com",
    shortCode: "nak",
    dateCreated: new Date("2022-02-17T14:41:33"),
    visits: 160
  });
}

module.exports = {
  urls,
  seedSampleData
};
- In our data folder we create an app-data.js file. It will hold the data layer for the app. At the start we shall keep it in the memory and later we will implement database storage.
- The app-data.js component holds the urls and populates sample data (seed the data). We add an empty array that we fill with the seedSampleData() function.
- In our function we have 2 different objects {} that we push into the urls array.
- This is a temporary solution and in our next parts will be changed with a real database.
Home Page Template: home.pug
This file hold the Pug template for the app home page, it its first version (before adding the layout):
h1 URL Shortener
ul
  li Short URLs: <b>#{urls.length}</b>
  li URL visitors: <b>#{visitors}</b>
- Finally, we create our home.pug view inside the views folder. That is the HTML page that will load when the user goes to the ‘/’ URL, that we defined in our controller.
- We have an unordered list ( ul ), in which we have two rows ( li ). The first is for the count of our URLs, and the next is the total sum of all visitors summed from all URL visits.
- If we want to print the data bound to the variable visitors, we must add hashtag # and braces { } around it so that our compiler knows that this isn’t a regular HTML text.
Running the App for the First Time
When we run the app for the first time, it will install most of the required libraries:
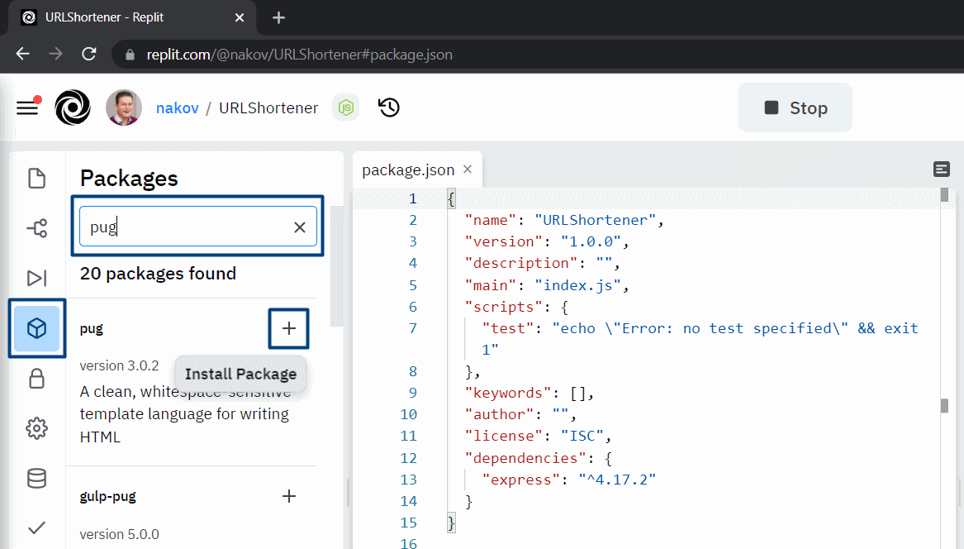
Then, most probably, the app will show a missing dependency: the pug library:
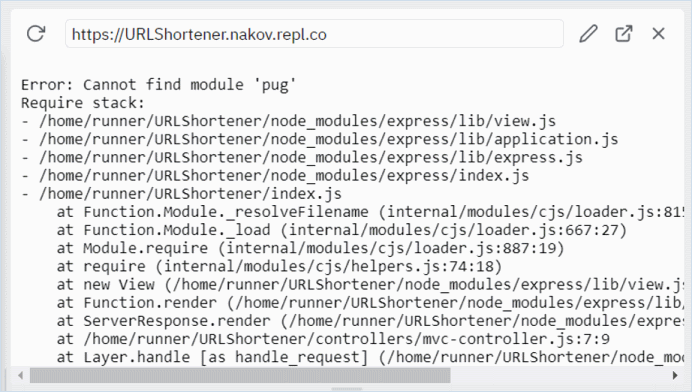
Installing Pug from NPM in Repl.it
The missing “Pug” library can be installed using the NPM package manager from the Repl.it:
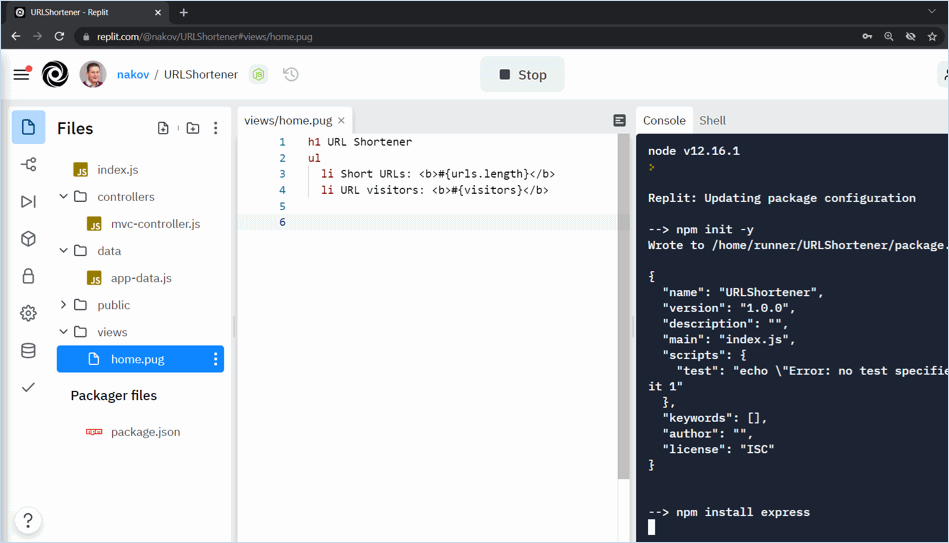
Running the App Again
After completing all the previous steps you will have a simple working JS Web app, which will be able to display some sample data in the Web browser. This is how the app may look like in Repl.it, when running properly:

This is not much, but we just started. We will handle the rest in the next parts of this video tutorial.
URL Shortener in JS: Part 2 – Building the App UI
In this second part of my “URL Shortener” project-based JavaScript tutorial, we shall build the user interface (UI) of the app:
- Site layout: the layout template (master layout holding page header part, main part and footer part)
- Page UI: the Pug templates for each app page (the app screens)
- Page controllers: the controller actions for each page, showing sample data in the UI
- CSS styles: the desktop and mobile CSS style definitions for app header, footer, main part, tables and forms
Watch the video lesson and follow the steps to continue building the JS URL Shortener app yourself:
The Source Code for “URL Shortener – Part 2”
You can play with the source code from this first part of the “URL Shortener in JS” tutorial here: https://replit.com/@nakov/URLShortener-Part-2.
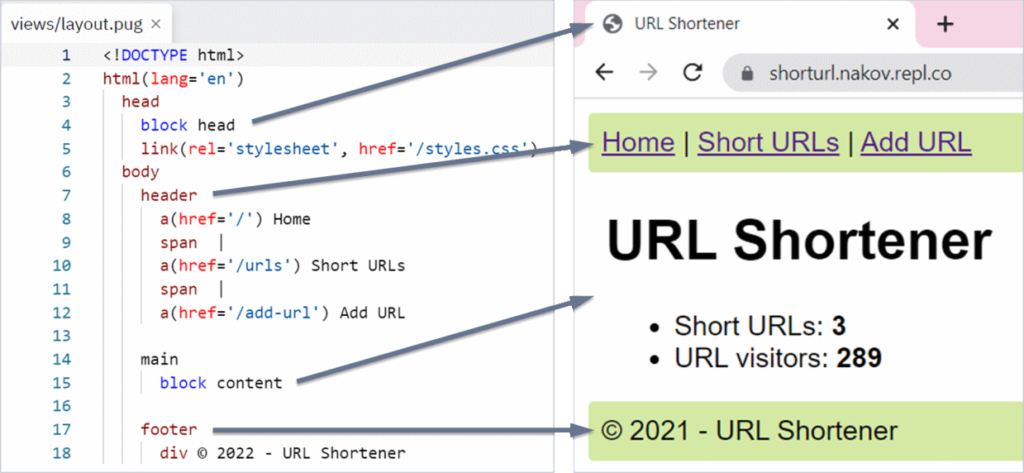
Create the Site Layout Template
The site layout template (layout.pug) defines the layout for all site pages:
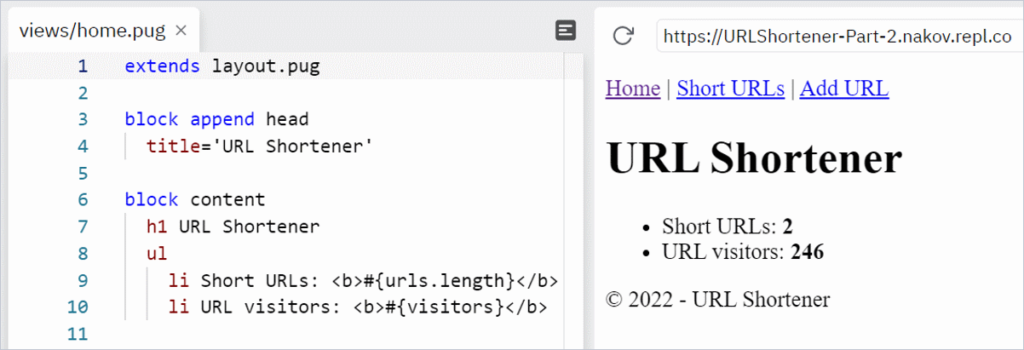
Create the Home Page Template
Now we can rewrite the home page template to use the layout template:
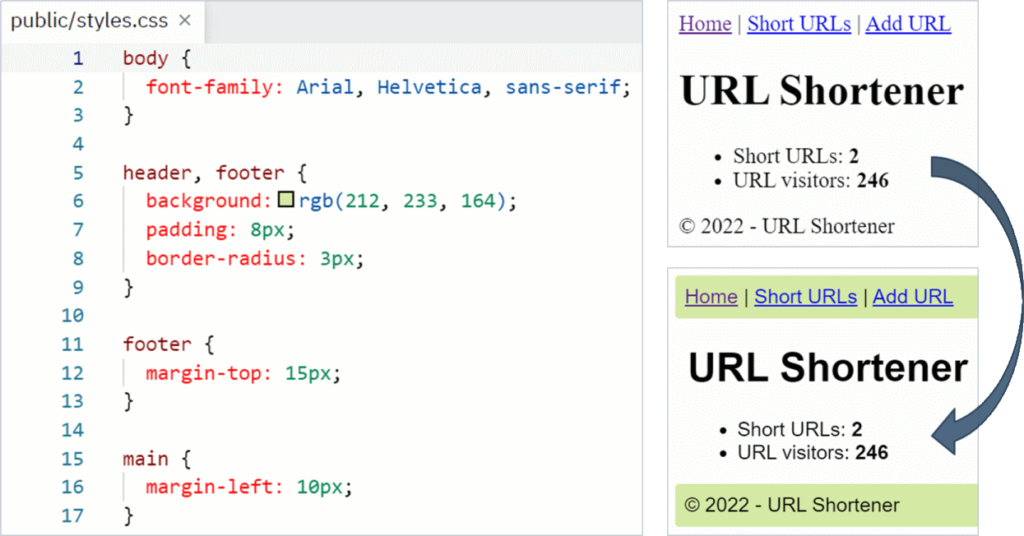
Define the Basic CSS Styles
Let’s define some CSS styling to make the site layout look better:
Implement the “View Short URLs” Page
Define a new controller action to handle “GET /urls“:
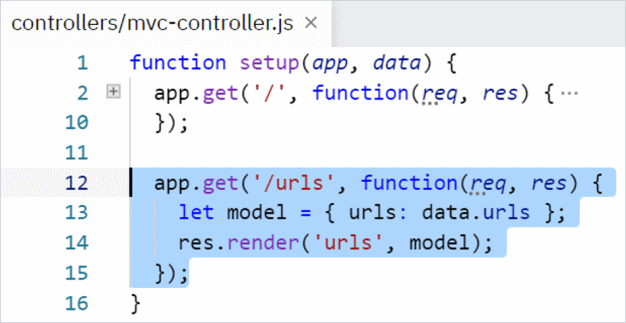
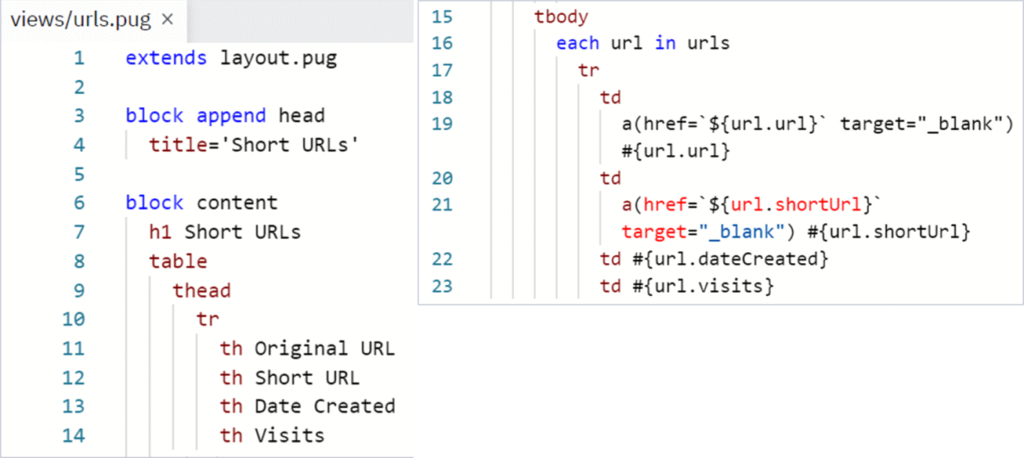
View Short URLs: Page Template
Define a template urls.pug to render the short URLs in an HTML table:
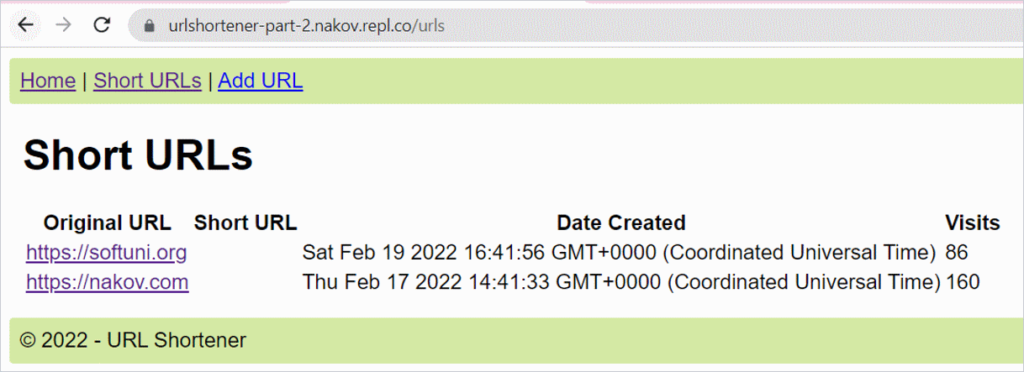
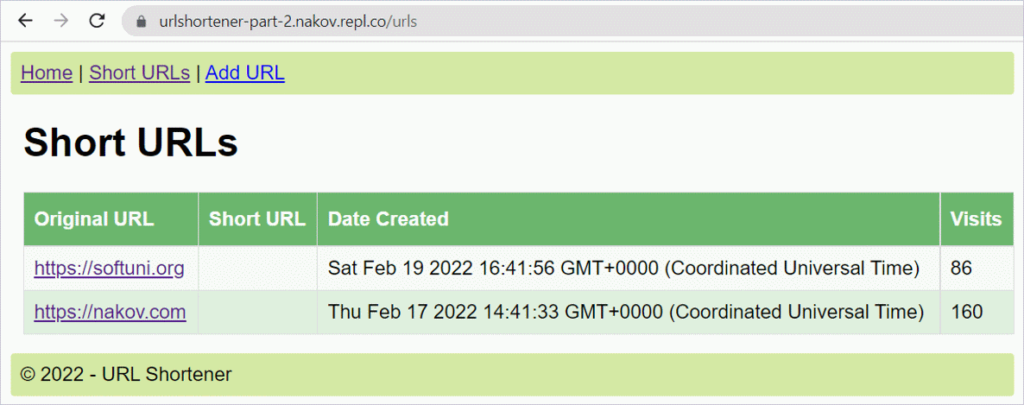
The Short URLs Page in the Browser
If you follow the video tutorial correctly, you will get the following result, when the “View Short URLs” page in open in the Web browser:
Styling the Short URLs Table
Let’s write some CSS to make the tables look better (and in particular the table, holding the short URLs):
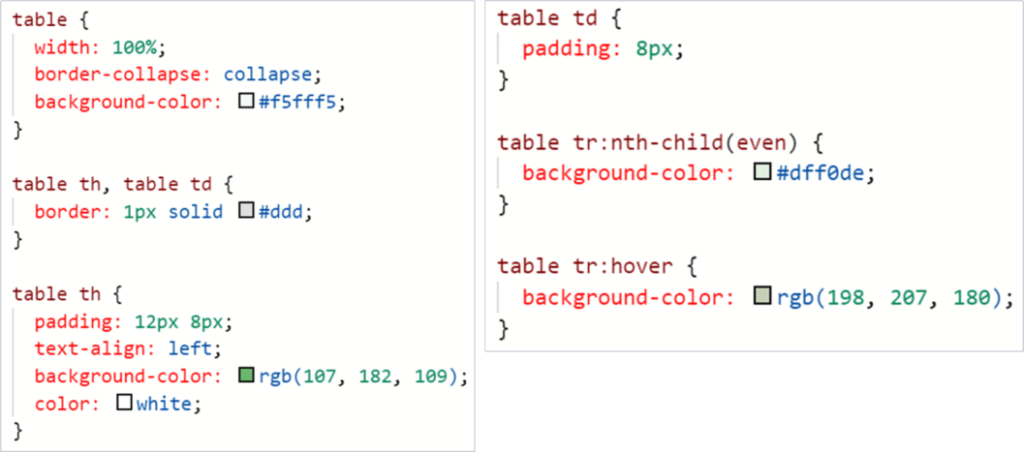
With the above CSS styles, the “Short URLs” table now looks quite better:
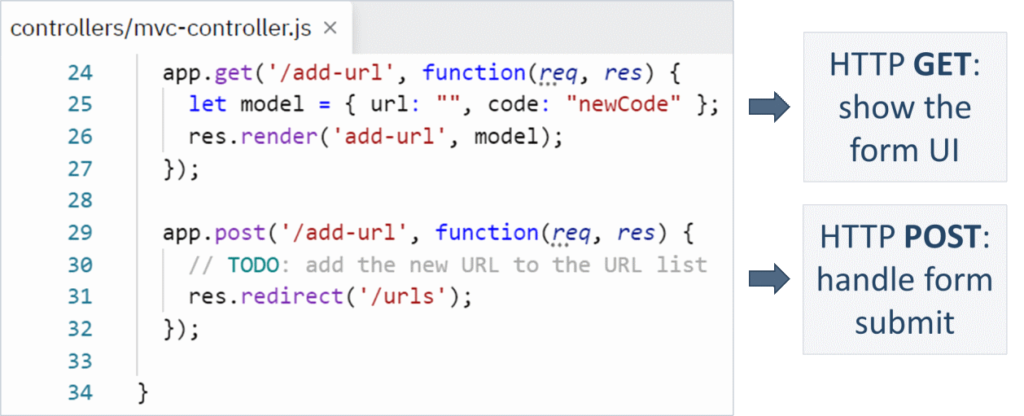
The “Add URL” Controller Actions
To implement the “Add URL” functionality, we shall need controller actions + UI templates (views). Let’s first define the controller actions:
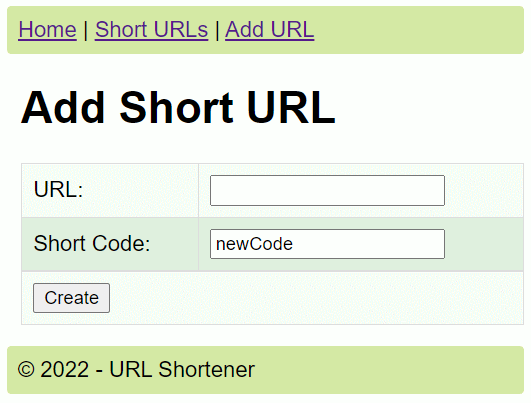
The “Add URL” Form
Let’s create the “Add URL” form template:

This is how the “Add URL” page should look in the Web browser:
Add Mobile Device Support
The app UI looks broken on small screens (like smartphones and tablets):
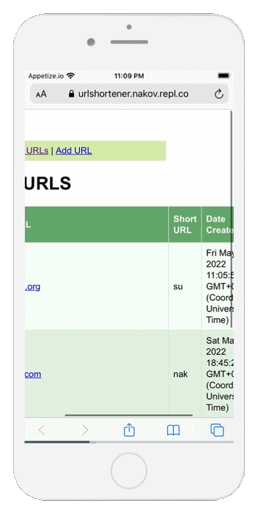
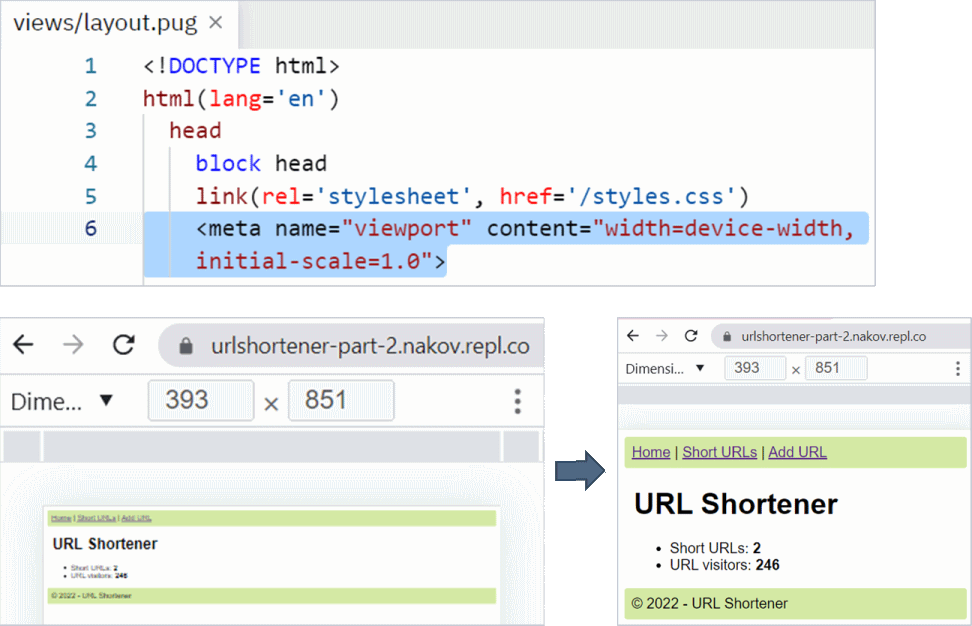
Mobile Device Support: Viewport
The visible page area (viewport) should match the device screen width:
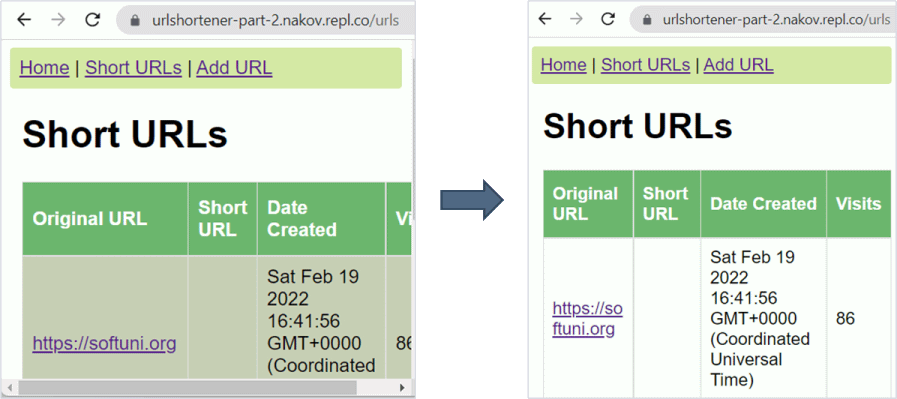
Fixing Mobile Issues: Long Tables
Long table content will cause a horizontal scrollbar. The fix is easy:
table td {
  word-break: break-all;
}
This is how the table will look on small screens after the above fix:
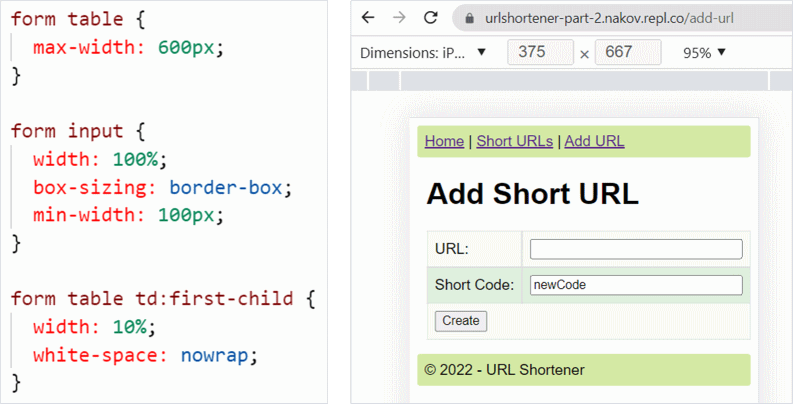
Styling the Form for Mobile
On mobile devices, where the screen is small, the “Add URL” form looks unpleasant and does not resize as expected. This is how we can fix it:
URL Shortener in JS: Part 3 – Implementing the App Functionality
Keep up with the next part of this tutorial and see how our project grows over the time. It’s coming soon.
8 Responses to “Creating an URL Shortener App in JavaScript: a Step-by-Step Project Tutorial”
Dinosaur dildos
Svetlin Nakov – Svetlin Nakov – Official Web Site and Blog » Creating an URL Shortener App in JavaScript: a Step-by-Step Project Tutorial
This sequence of articles is fantastic! We are grateful for everything you do; you consistently perform an excellent, astute, and captivating job!
It’s very useful. Big thanks!
Awesome post! Thanks for the great content you shared here.
I can hardly believe how simple it is to pull off!
I can hardly believe how simple it is to pull off! Thank you very much!
Using MapQuest feels like getting directions from a trusted friend who knows the best way to go, every time.
Geometry Dash Lite, I really appreciated your detailed guide on creating a URL shortener! The step-by-step breakdown made it seem so approachable. How do you recommend handling potential security issues that might arise with user-generated links?